Configure the Microsoft Azure authentication provider
We will use Microsoft Entra (Microsoft Azure) for login and either the Azure/Entra ID Token or Microsoft Graph to provide roles.
Configure Microsoft Entra
Go to Microsoft Entra and login
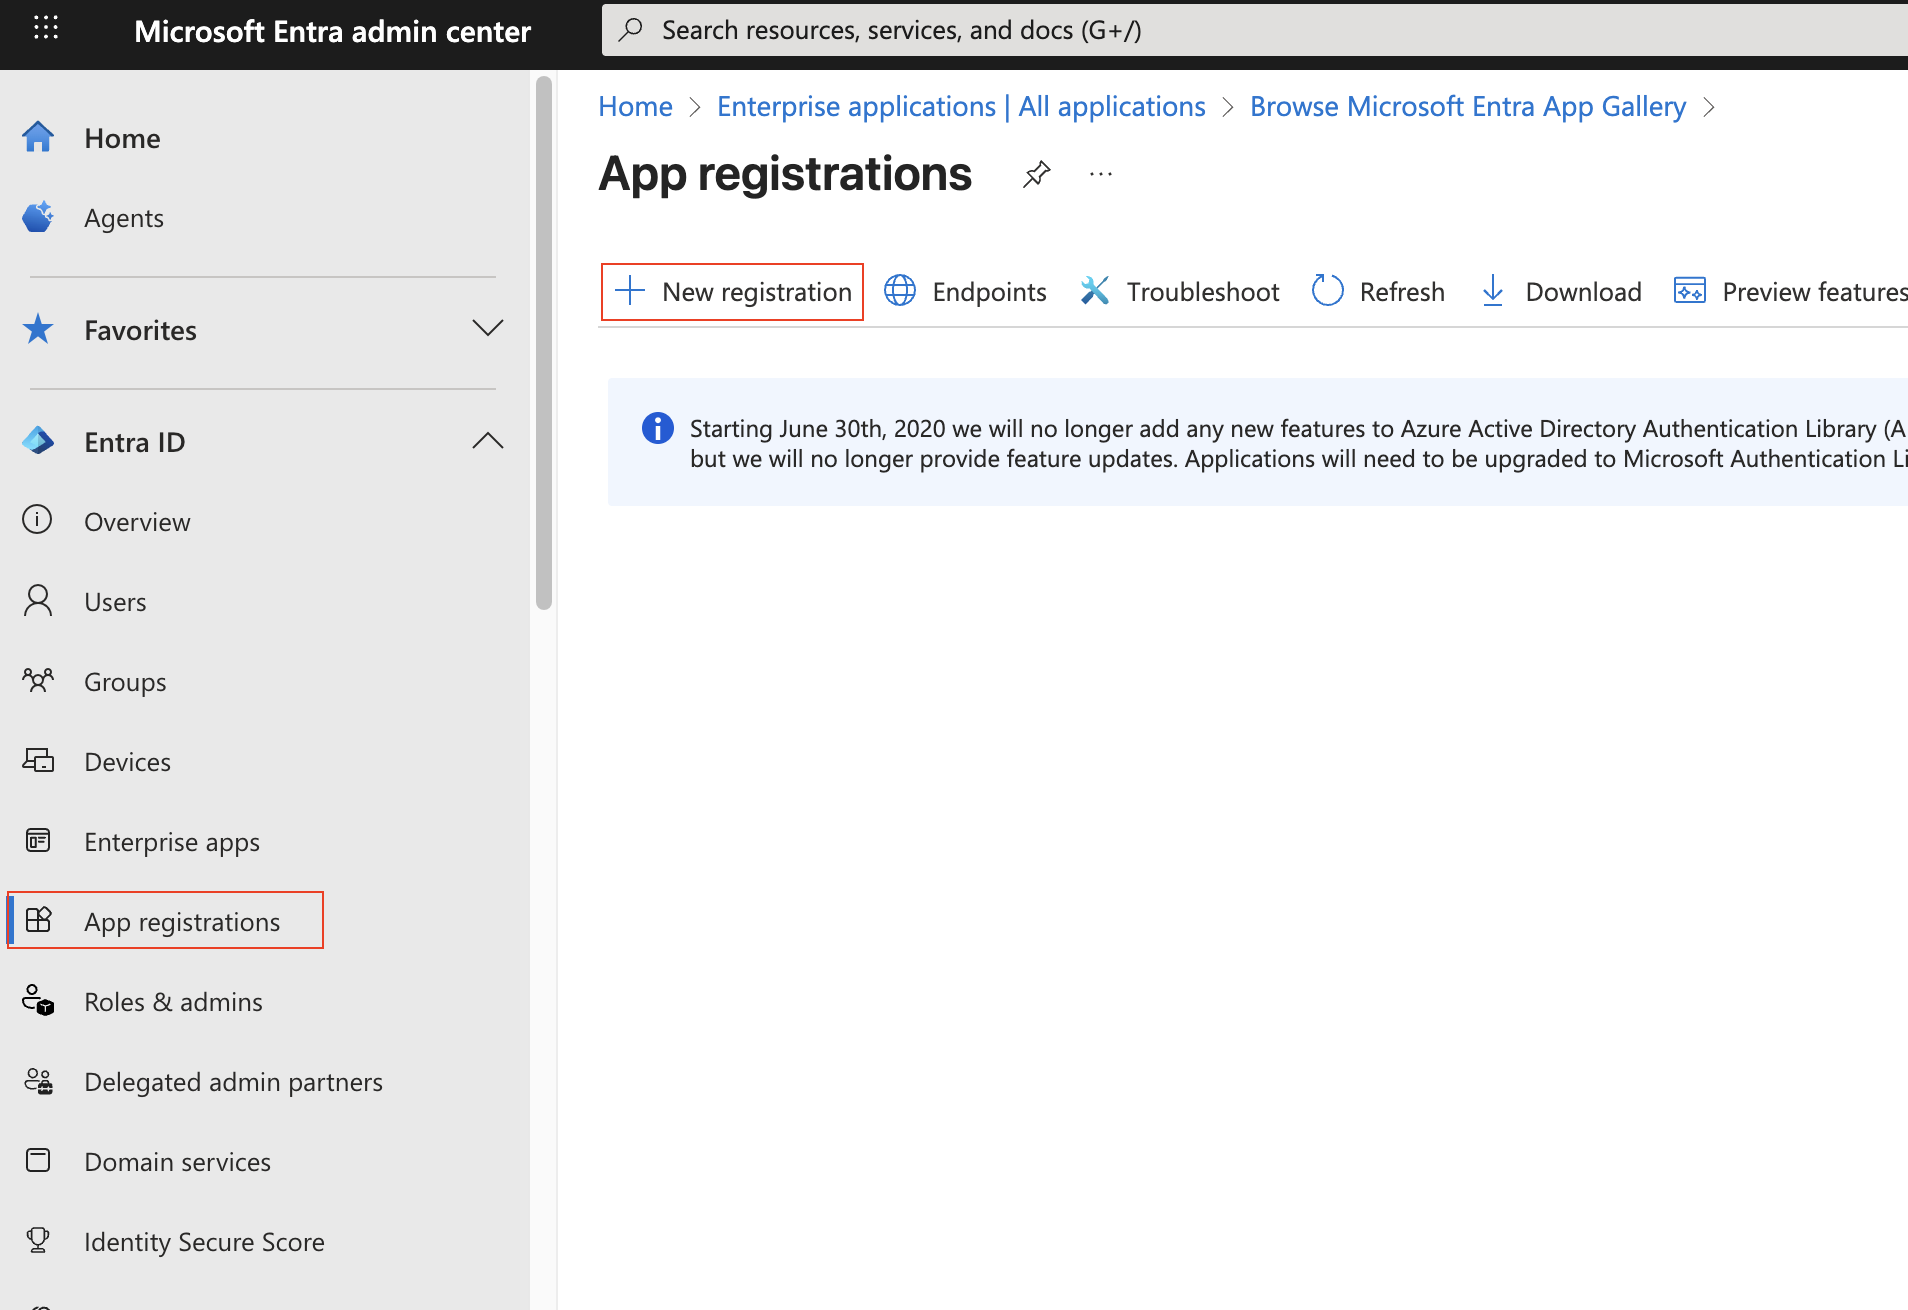
Click on “App Registration” (left column), then “+ New Registration” (top bar)
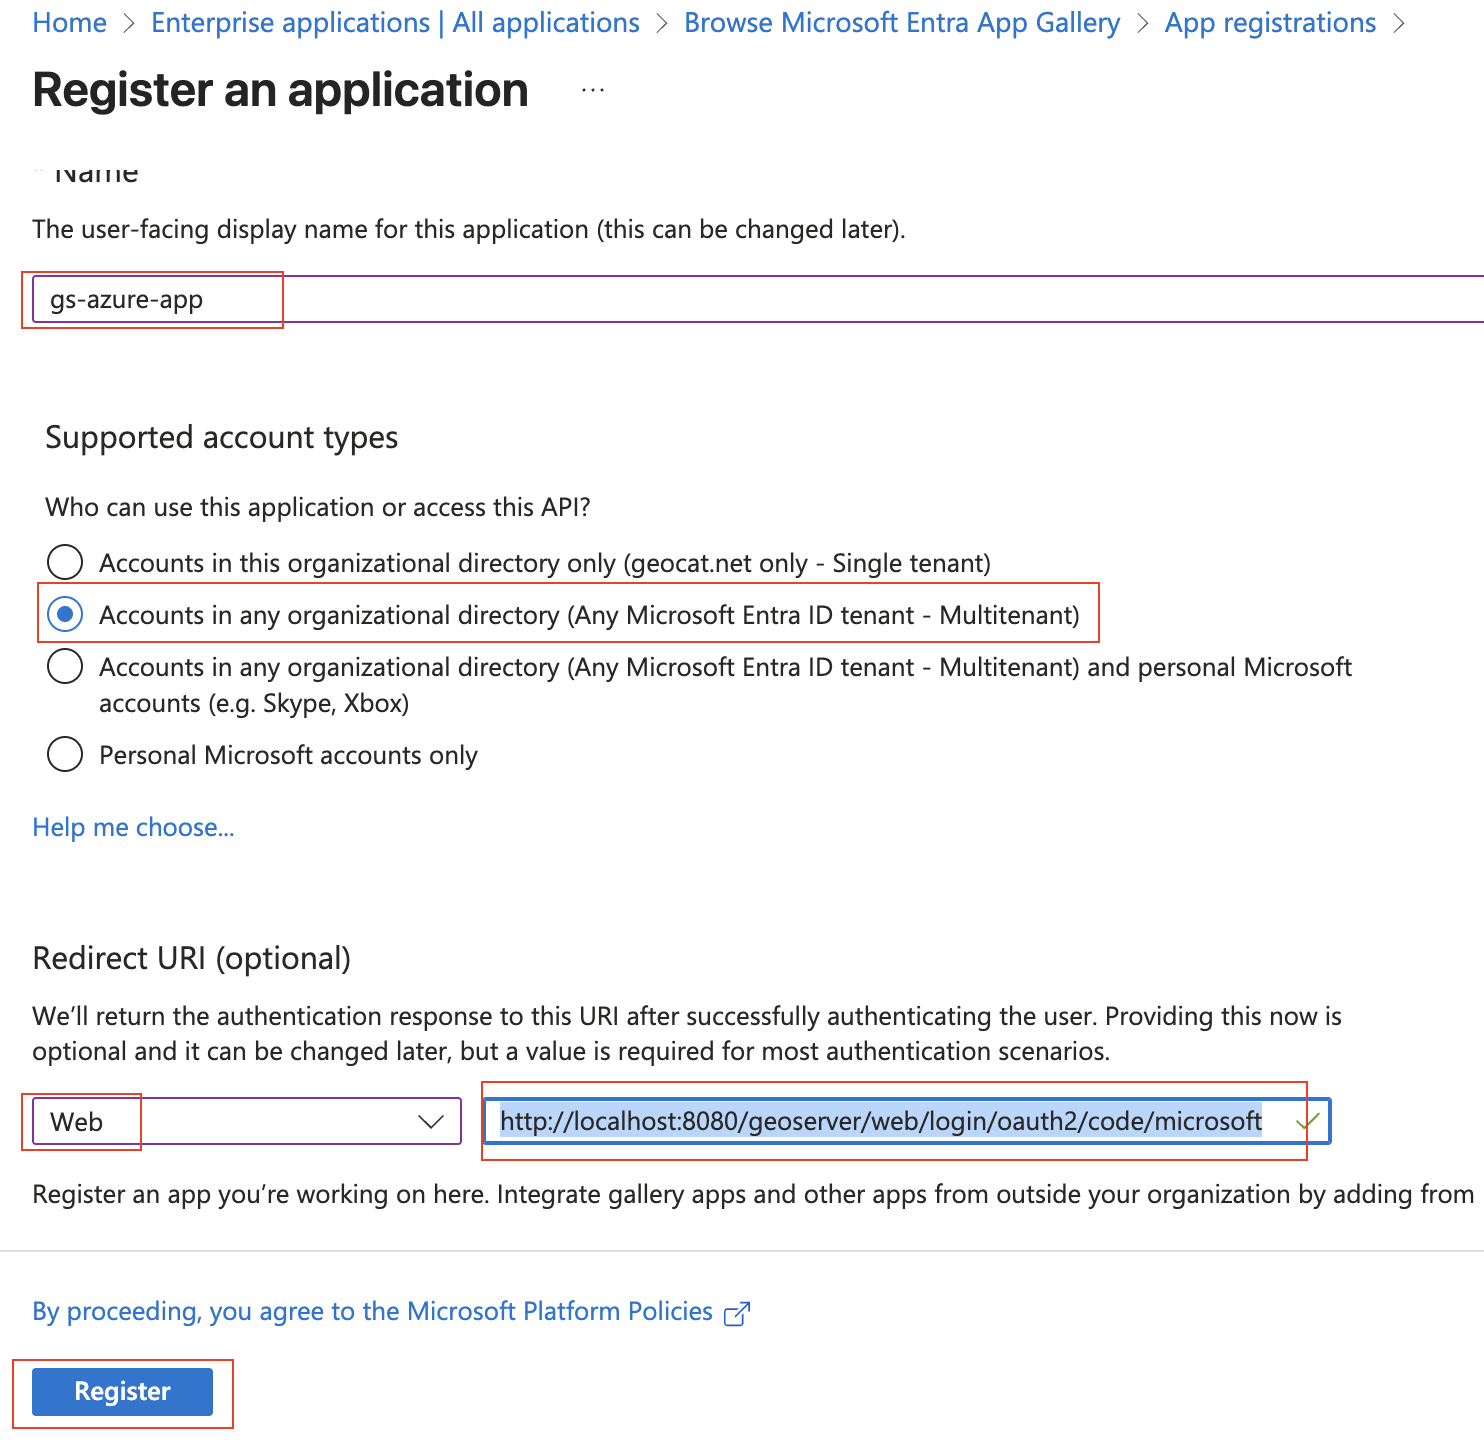
Give the application a name (“gs-azure-app”), set it to the MultiTenant. Use “http://localhost:8080/geoserver/web/login/oauth2/code/microsoft” as the “Web” Redirect URI. Press “Register”.
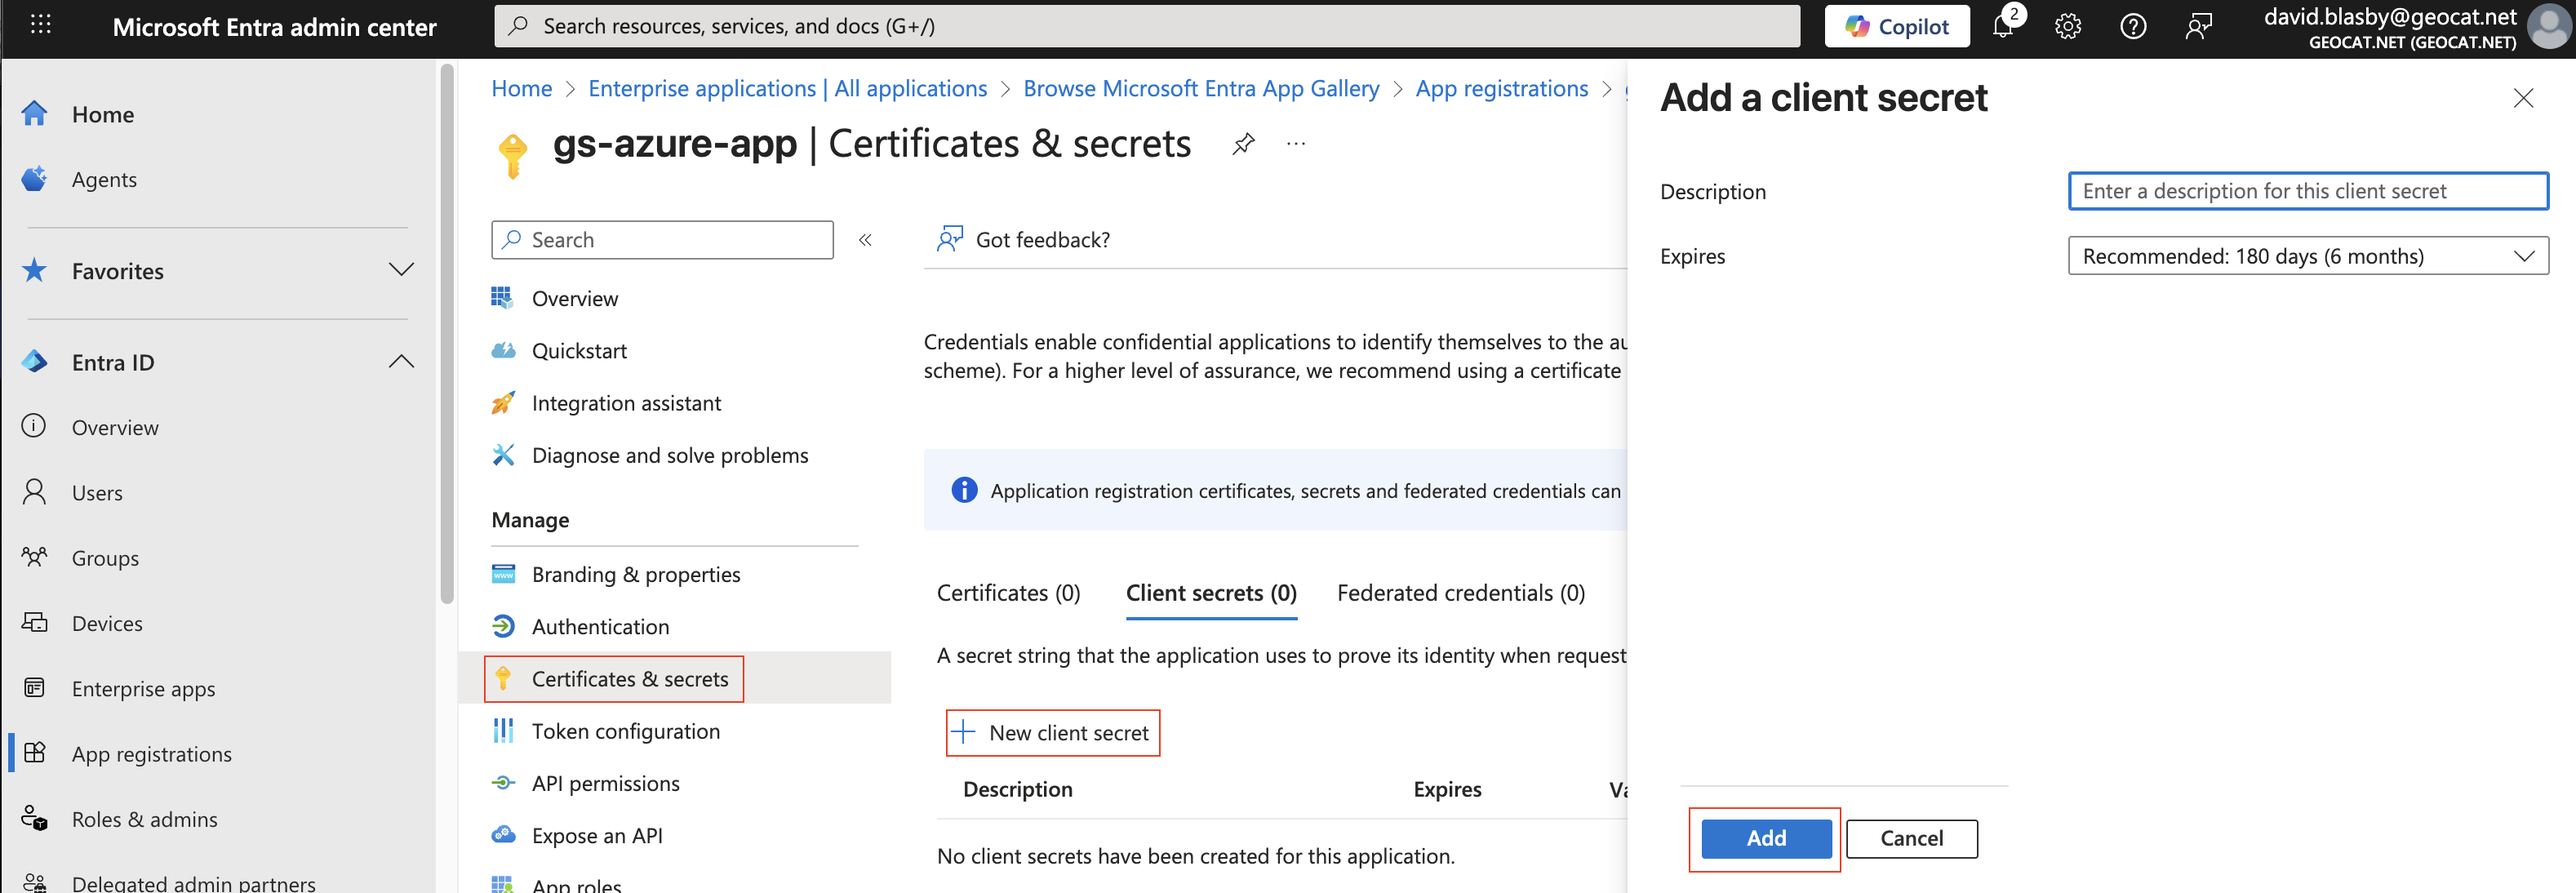
On the app summary screen, press “Certificates & Secrets”, “+ New client secret”, then press “Add”.
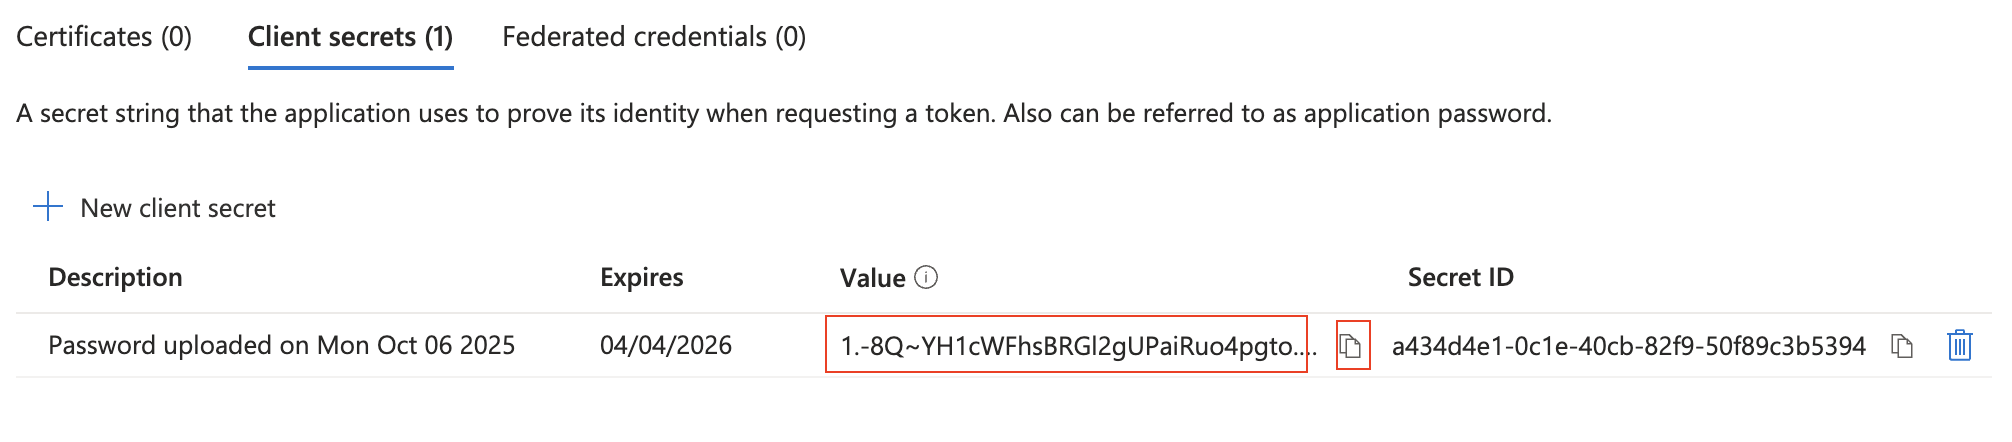
Make sure you copy-and-paste the created Client Secret - you will need this later and you can only access now. Ensure you got the “Value” (not the ID).
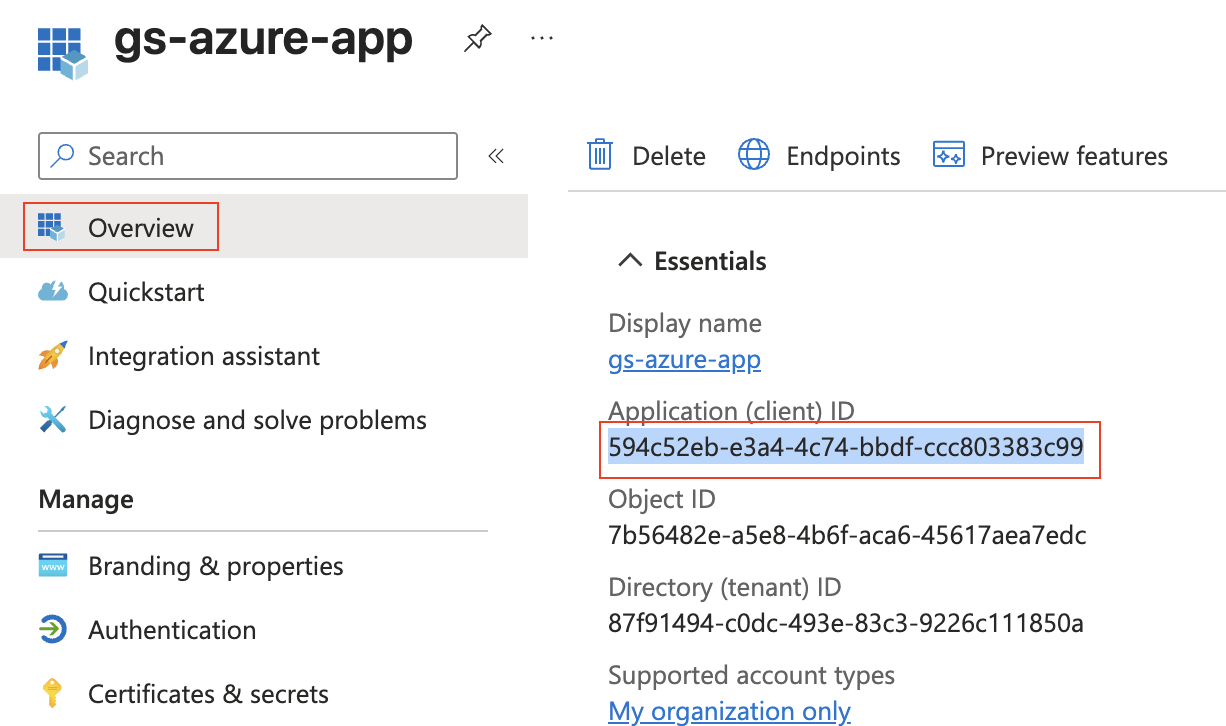
Press “Overview” (left column) and record the “Application (client) ID” - you will need this later.
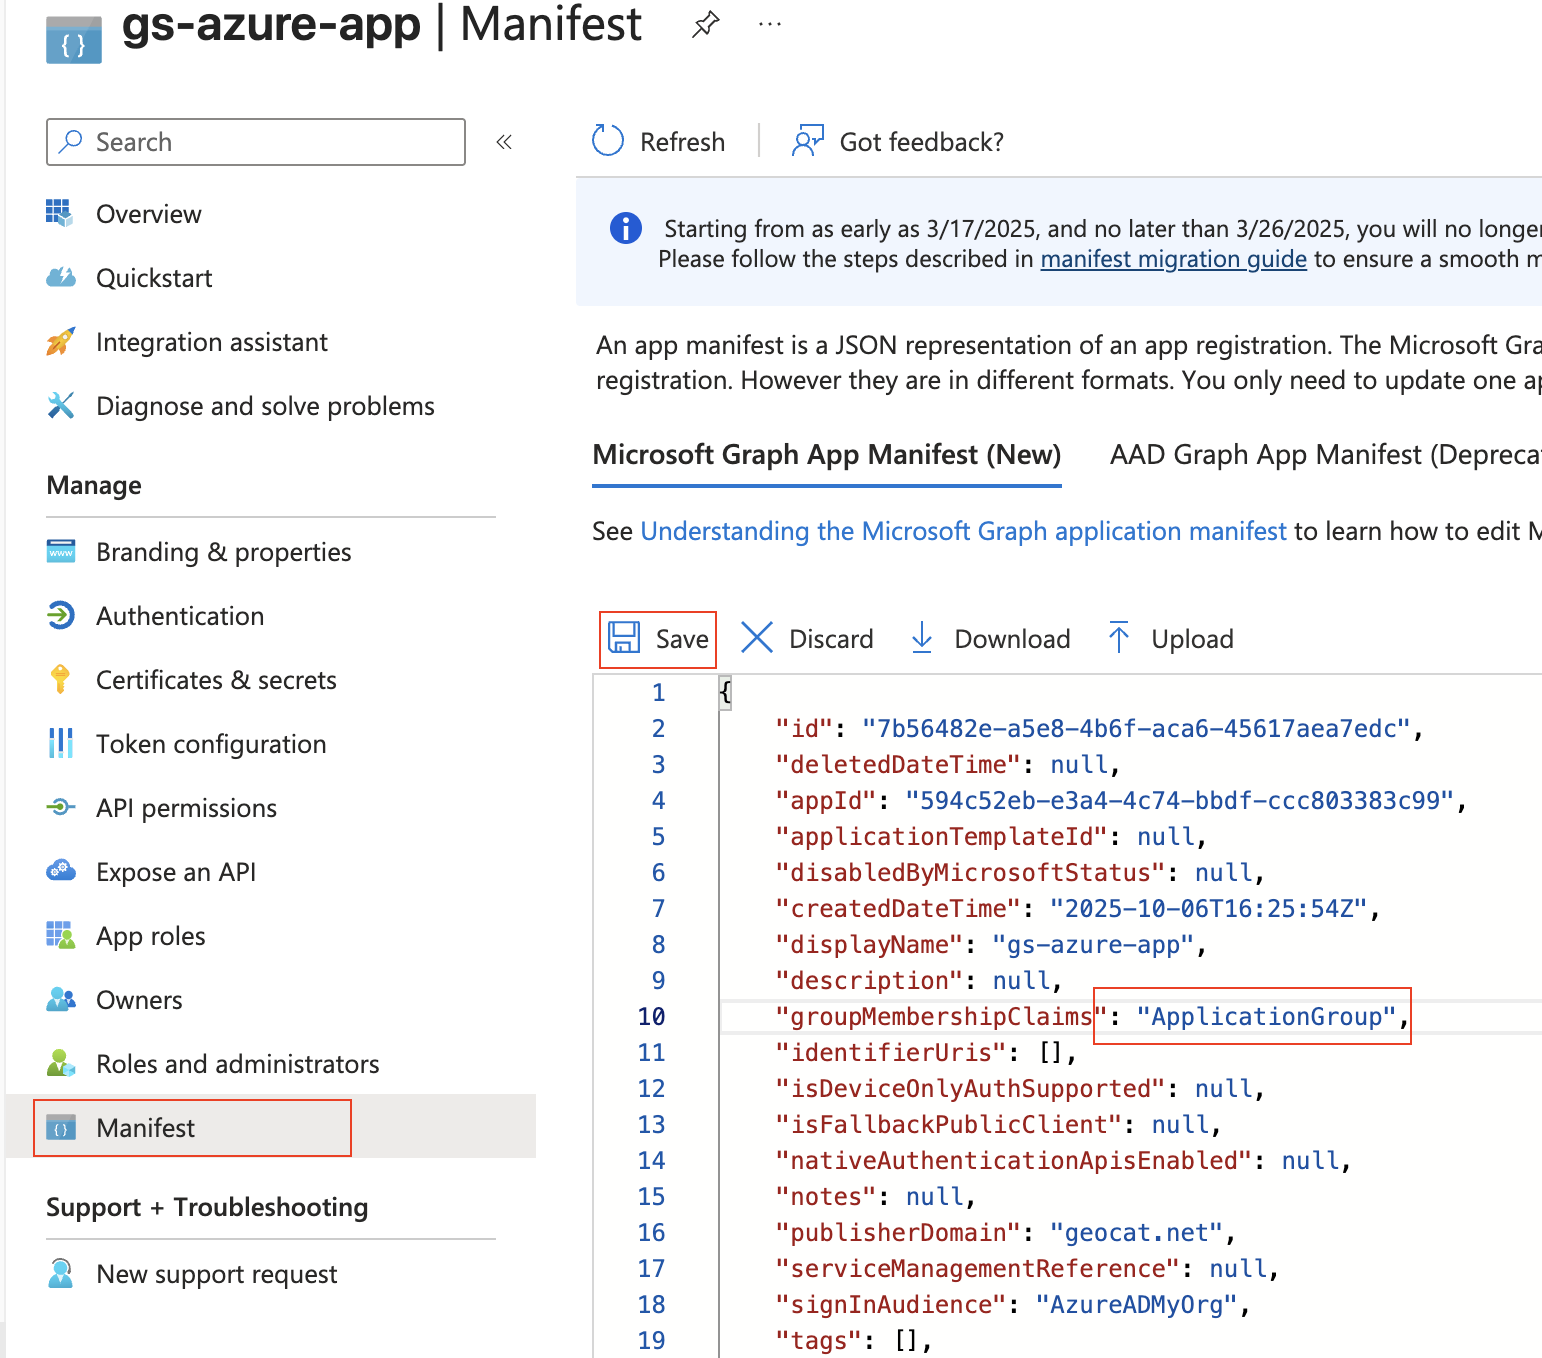
Press “Manifest” (left column), and change “groupMembershipClaims”:null, to “groupMembershipClaims”: “ApplicationGroup”, and press “Save”. This puts the roles in the ID Token.
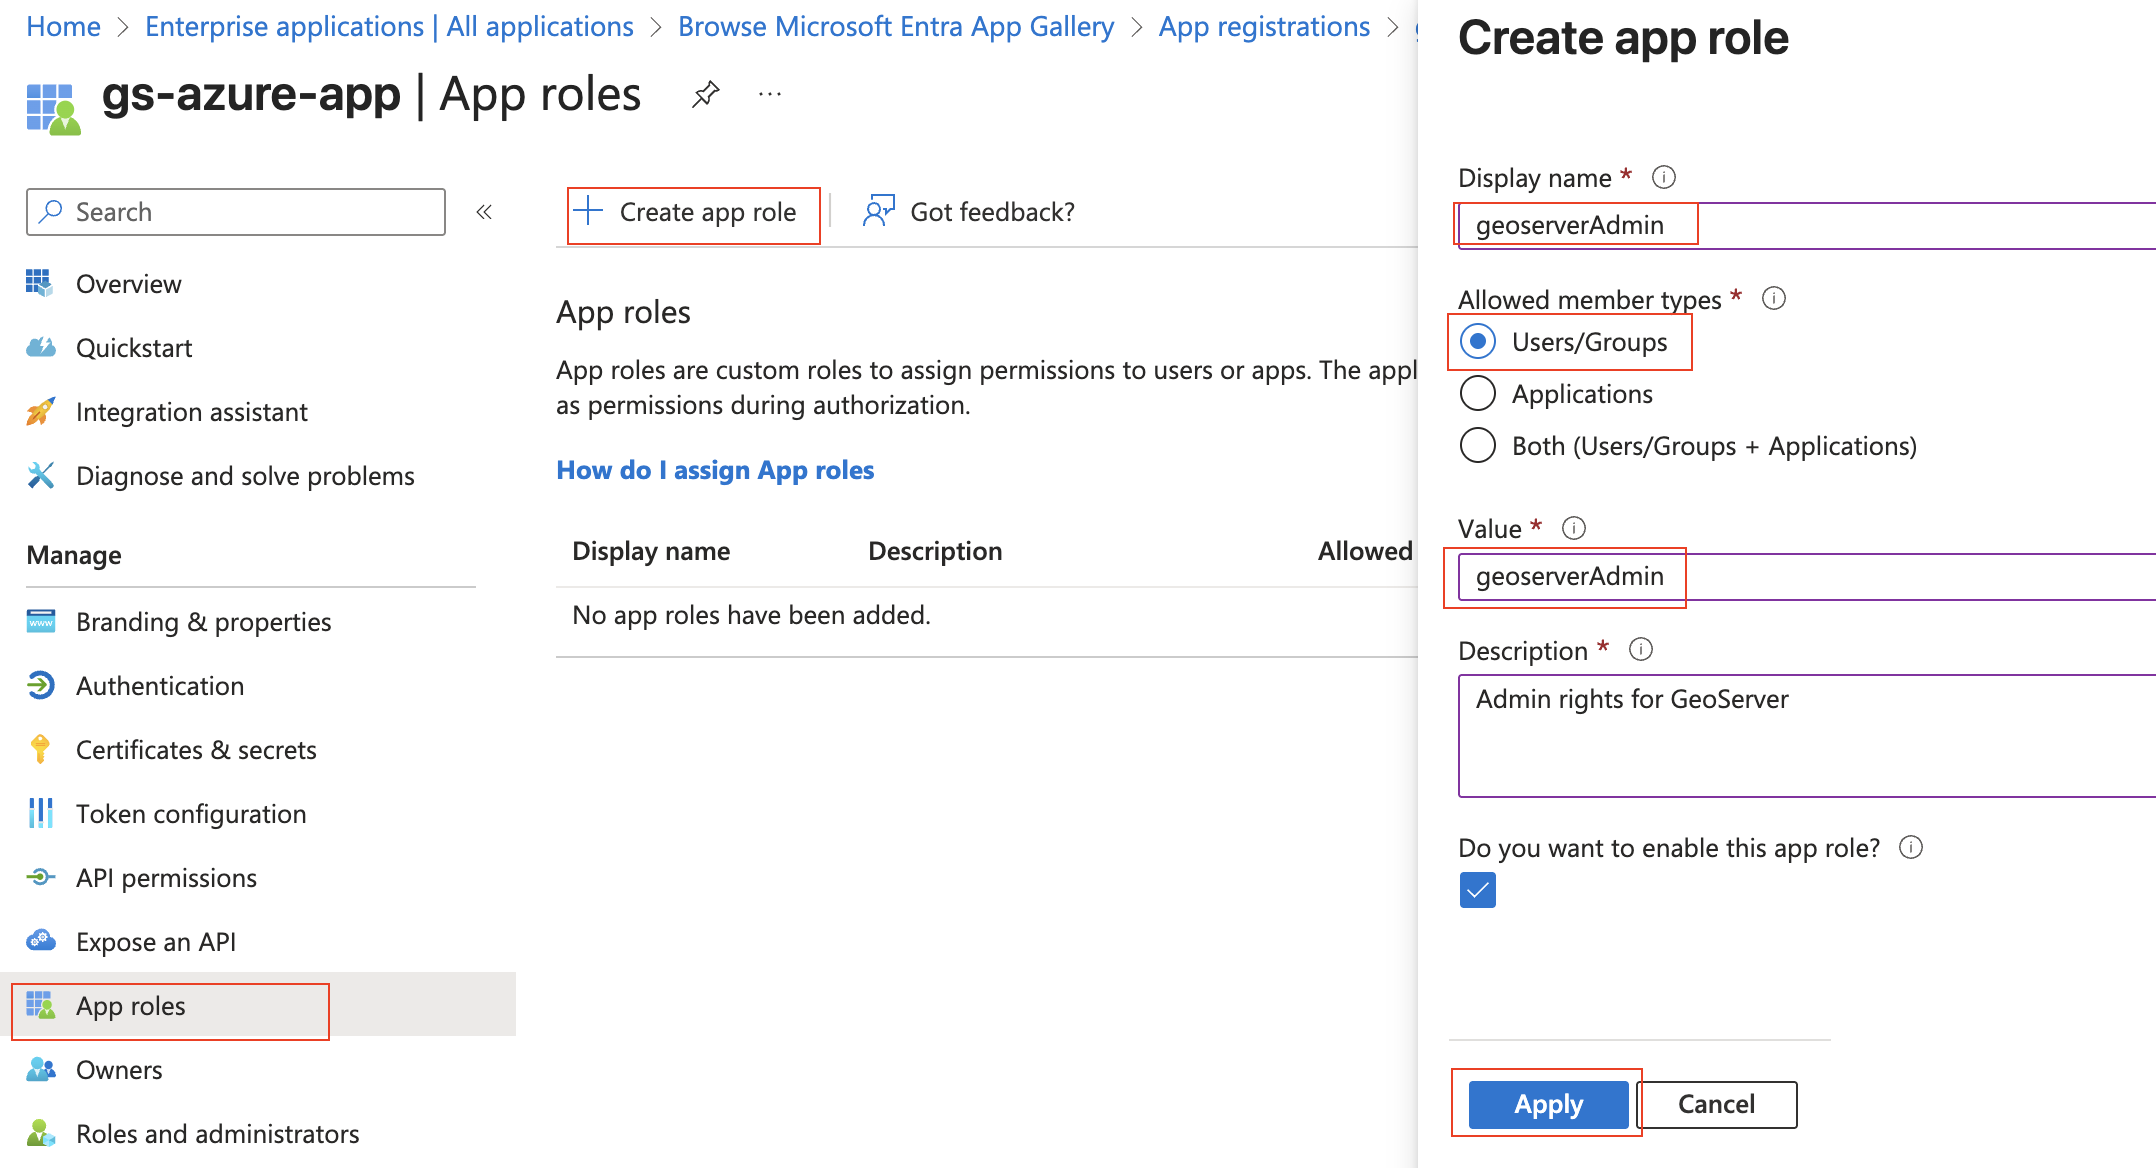
Press “Add roles” (left column), then “+ Create App role”, set the “Display name” and “Value” to “geoserverAdmin” and press “Apply”.
Press “Enterprise Apps” (far left column), choose your application (“gs-azure-app”), and press “Assign users and groups”.
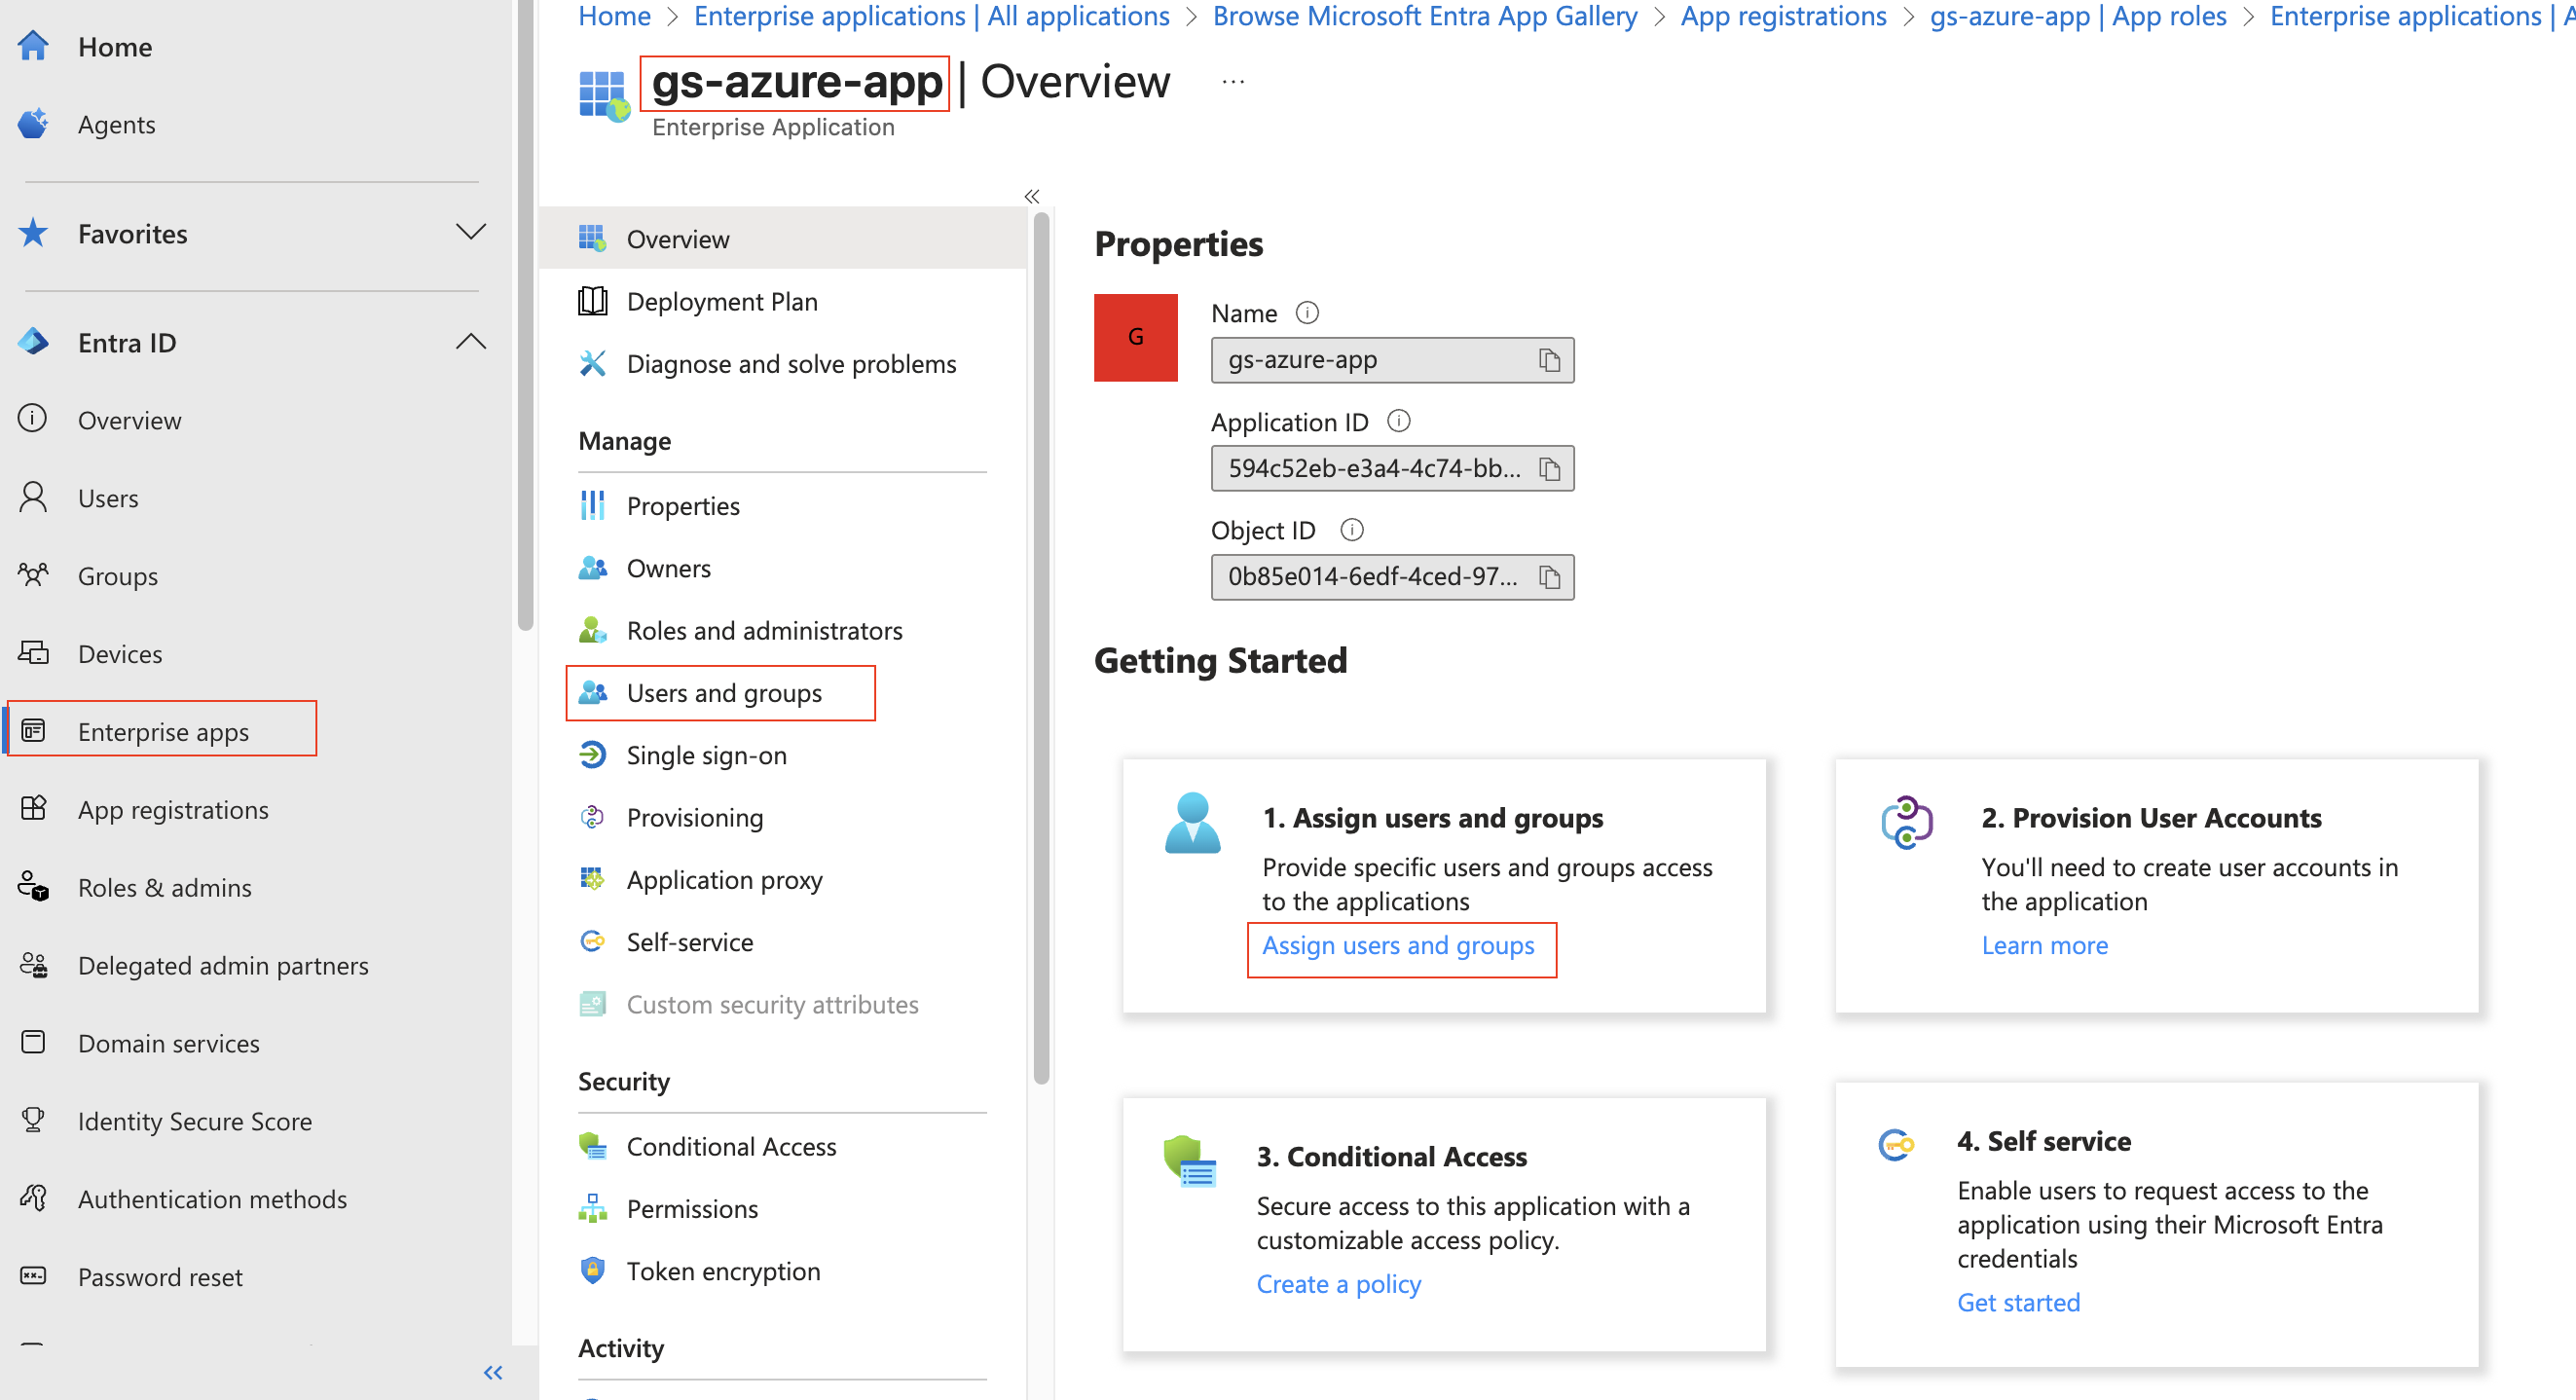
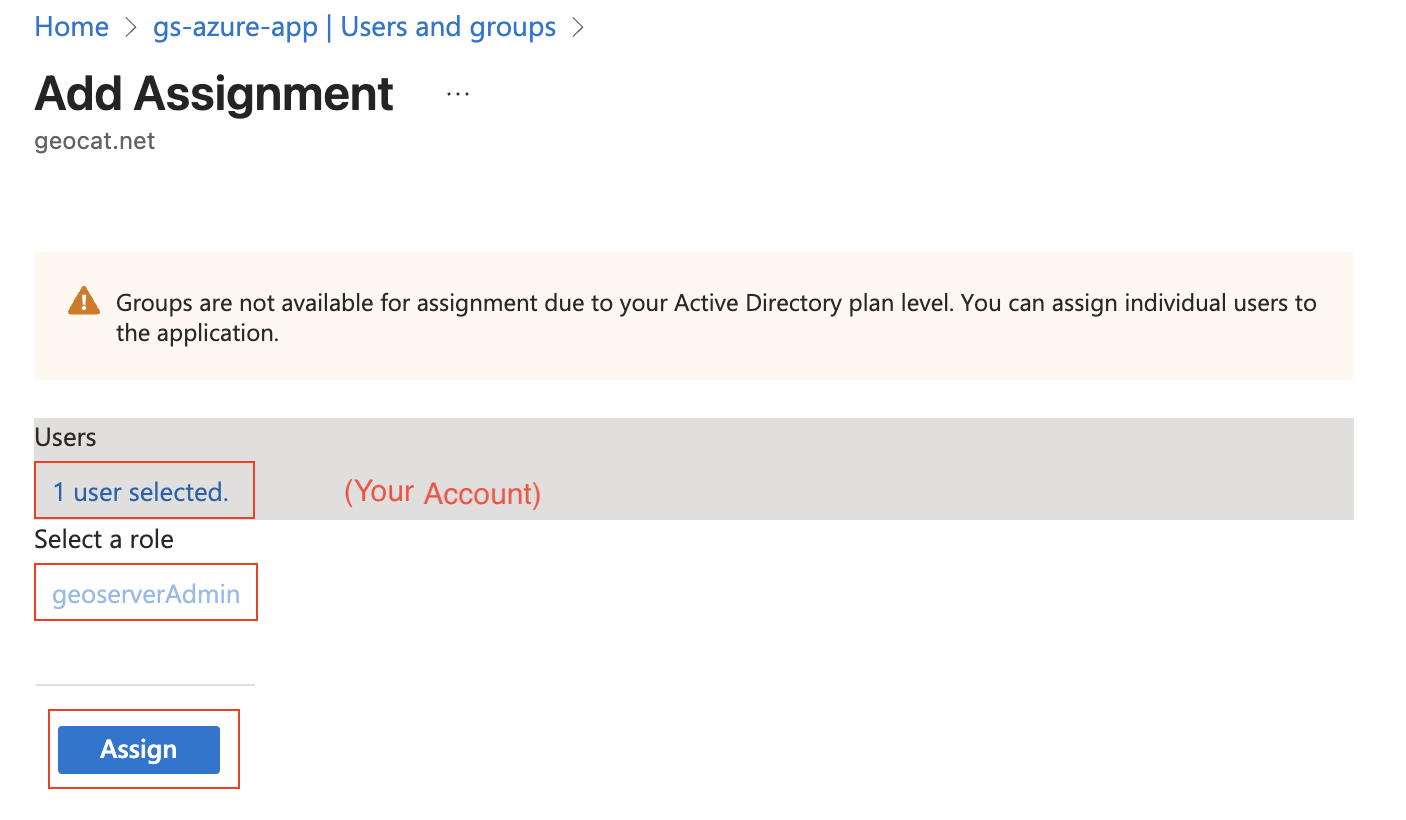
At the top press “+ Add user/group”. Under “Users”, press “None Selected” and then choose your account. Under “Select a role”, keep the selection as “geoserverAdmin”. Press “Assign”.
Configure GeoServer
The next step is to configure your Azure Application as the OIDC IDP for GeoServer.
Ensure you have the following:
Your Client ID (“Application (client) ID”). This is a guid.
Your Client Secret. This is a guid.
Name of the geoserver admin Role (“geoserverAdmin”)
Your Directory (tenant) ID, if you intend to restrict sign-in to a single directory. This is a guid, shown next to the Application (client) ID on the app registration “Overview” page.
Choose the tenant scope
Decide this before configuring the filter, because it also affects how the application is registered in Azure.
Directory (tenant) ID empty |
Directory (tenant) ID set |
|
|---|---|---|
Who can sign in |
Any Microsoft work, school or personal account |
Only accounts in that one directory |
Endpoints used |
|
|
Azure registration |
Multitenant |
Single tenant |
Bearer tokens (if enabled) |
Accepted from any tenant, for any application |
Must name this tenant and this application |
Leaving the field empty is the default and is what an existing configuration does after upgrading.
Warning
A tenant-scoped JWKS URL is not by itself a restriction. Microsoft Entra serves the same v2.0 signing keys from every tenant path, so a valid signature proves only that Microsoft issued the token, not which directory it came from. Restricting sign-in to one directory is what the Directory (tenant) ID field does, by requiring that the token’s issuer names that tenant.
Create the OIDC Filter
Login to GeoServer as an Admin
On the left bar under “Security”, click “Authentication”, and then “OpenID Connect Login”
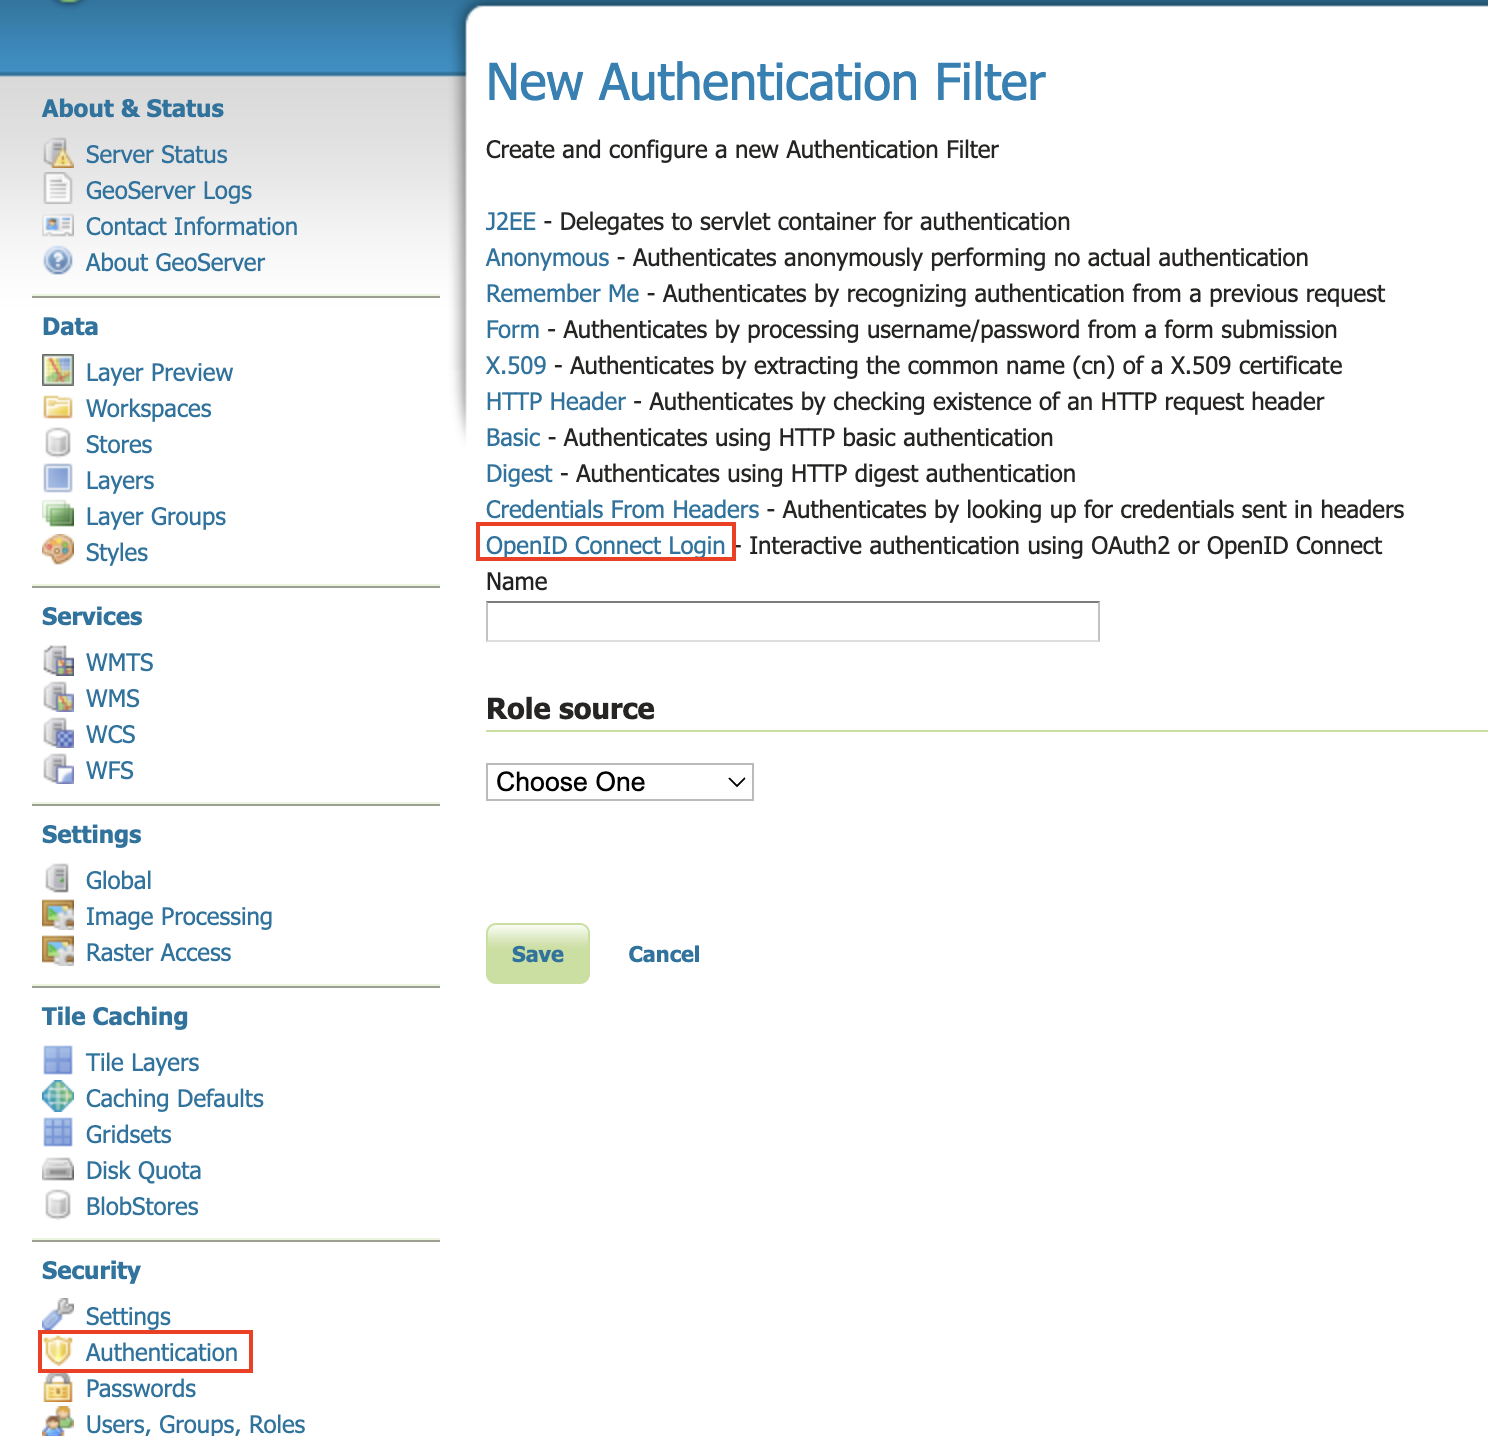
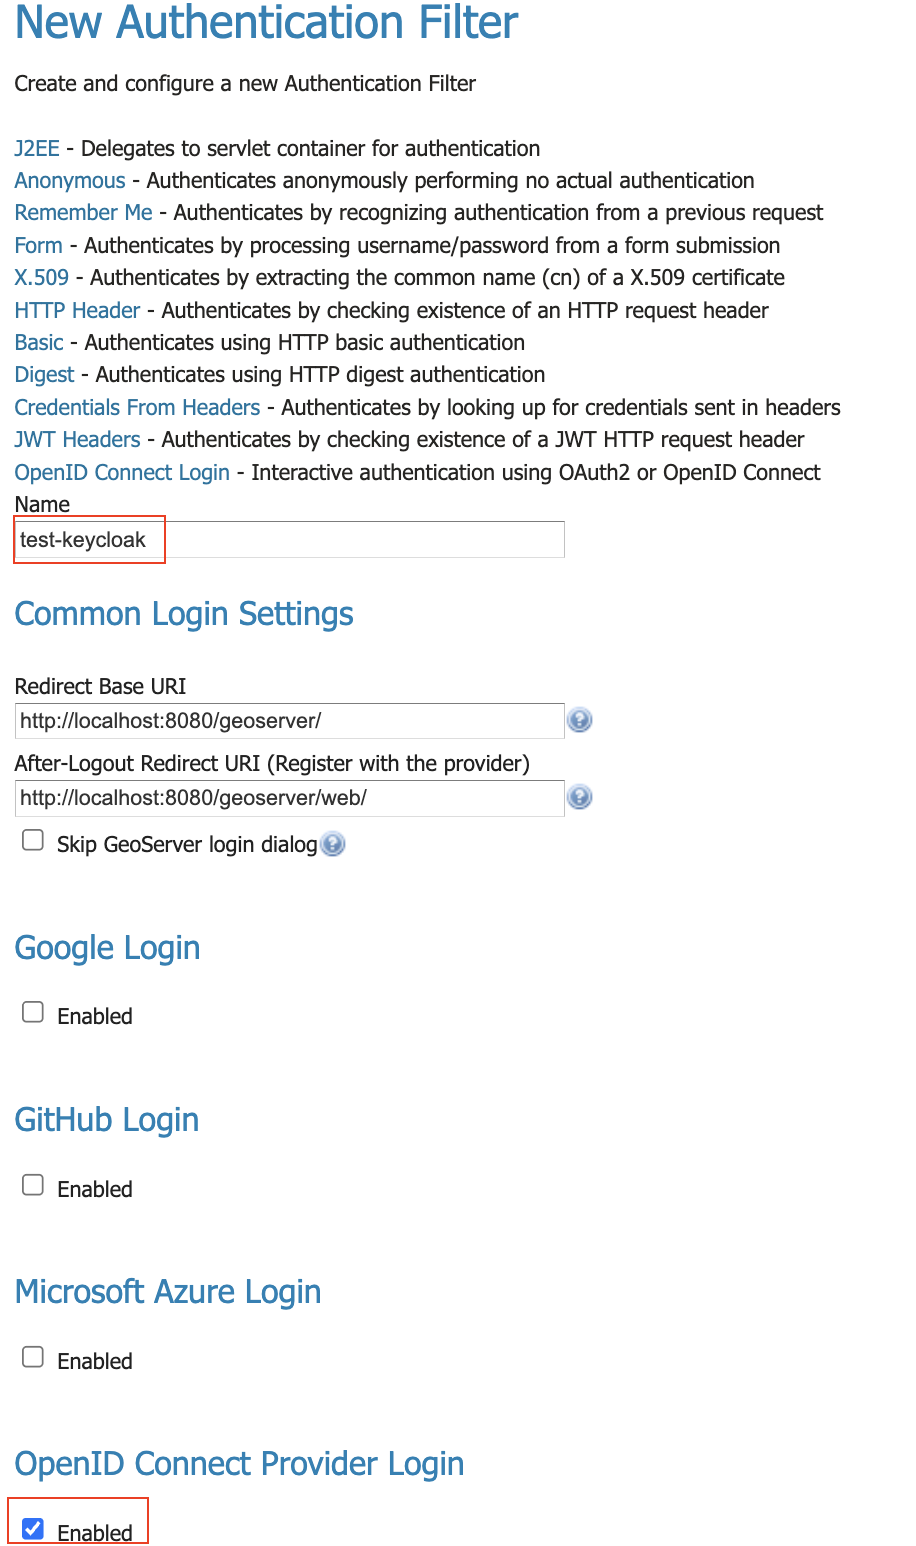
Give the it a name like “oidc-azure”, then click the “Microsoft Azure Login” checkbox.
Fill in the required information:
“Client Id” is the Azure “Application (client) ID”
“Client Secret” which was copied from Azure when you created it.
“Directory (tenant) ID” – leave empty to accept any Microsoft directory, or enter the tenant guid to restrict sign-in to that one directory. See Choose the tenant scope. The value must be the guid form;
contoso.onmicrosoft.com,organizationsandconsumersare rejected, because the issuer GeoServer has to match always spells the tenant as a guid.
Press Save
What correct behaviour looks like
Signing in successfully does not on its own prove the Directory (tenant) ID took effect. A single-tenant
Azure application already turns foreign accounts away at the shared common endpoint, so that test
passes whether the GeoServer field is filled in or left empty. The checks below distinguish the two.
Check where GeoServer sends users. Log out, press the Microsoft login button, and read the address bar before signing in.
Configuration |
Expected address |
|---|---|
Directory (tenant) ID filled in |
|
Directory (tenant) ID empty |
|
If you configured a tenant ID and still see /common, the value did not save – re-open the filter and
check the field.
Check what GeoServer received. Sign in, then look at the ID token in the GeoServer log; see
Troubleshooting for enabling that logging. Its iss claim should be
https://login.microsoftonline.com/<your tenant id>/v2.0. That claim is the one GeoServer enforces; the
tid claim beside it is informative only.
Check the REST API, if you use it with bearer tokens and have enabled Accept bearer tokens, which is
off by default on this release. With a tenant ID configured, a token minted by a different Entra tenant –
or minted for a different application in your own tenant – is rejected with 401. With the field empty,
both are accepted. This is the check that has no equivalent on the Azure side.
Troubleshooting
Symptom |
Cause |
Fix |
|---|---|---|
Saving the filter fails with “Microsoft Entra Tenant ID must be a valid UUID” |
The field contains something other than a guid – commonly the |
Use the Directory (tenant) ID from the Azure “Overview” page |
Entra rejects the sign-in with |
The Redirect URI registered in Azure does not match the one GeoServer sends |
Copy the read-only Redirect URI from the filter form verbatim into the Azure app registration. On
this release it ends in |
Entra rejects the sign-in with |
A foreign account tried to sign in to a single-tenant application |
Expected. Use a multitenant application if foreign accounts should be allowed |
Login completes but the user has no privileges |
No role source is configured, or the role converter does not match |
See the role source sections below |
Log shows “The ID Token contains invalid claims: {iss=…}” |
The id token came from a different directory than the one configured |
Check that the tenant ID matches the directory the user signs in to |
REST call returns |
A bearer token from another tenant |
Expected with a tenant ID configured. Use a token from the configured tenant |
REST call returns |
A bearer token minted for a different app registration in the same tenant, or an application ID URI
that is not |
Request the token for this application, or enable Validate token audience and enter your custom application ID URI |
Configure Role Role Source (ID Token)
When we configured Azure, we had it attach the roles to the ID token. We can use that to assign roles inside GeoServer.
Edit your “oidc-azure” security filter.
At the bottom, under “Authorization/Role source”, choose “ID Token”.
Use “roles” as the JSON Path
Use “geoserverAdmin=ROLE_ADMINISTRATOR” as the Role Converter
Tick the “Only allow External Roles that are explicitly named above”
Press Save
Configure Role Role Source (MS Graph) - Application Roles
Before you can use the MS Graph for permissions, you must give the app you created more permissions.
Setting up Azure
We need to setup azure so GeoServer can access the MSGraph and get the roles/groups the user is assigned to.
NOTE: in the ID token, the roles name is used (i.e. “geoserverAdmin”). However, in MSGraph, the role’s ID is used (a guid).
Login in to https://entra.microsoft.com/
Got to “App registration” (far left column), choose your application (“gs-azure-ap”), choose “API Permissions” (left column), then press “+ Add a permission”.
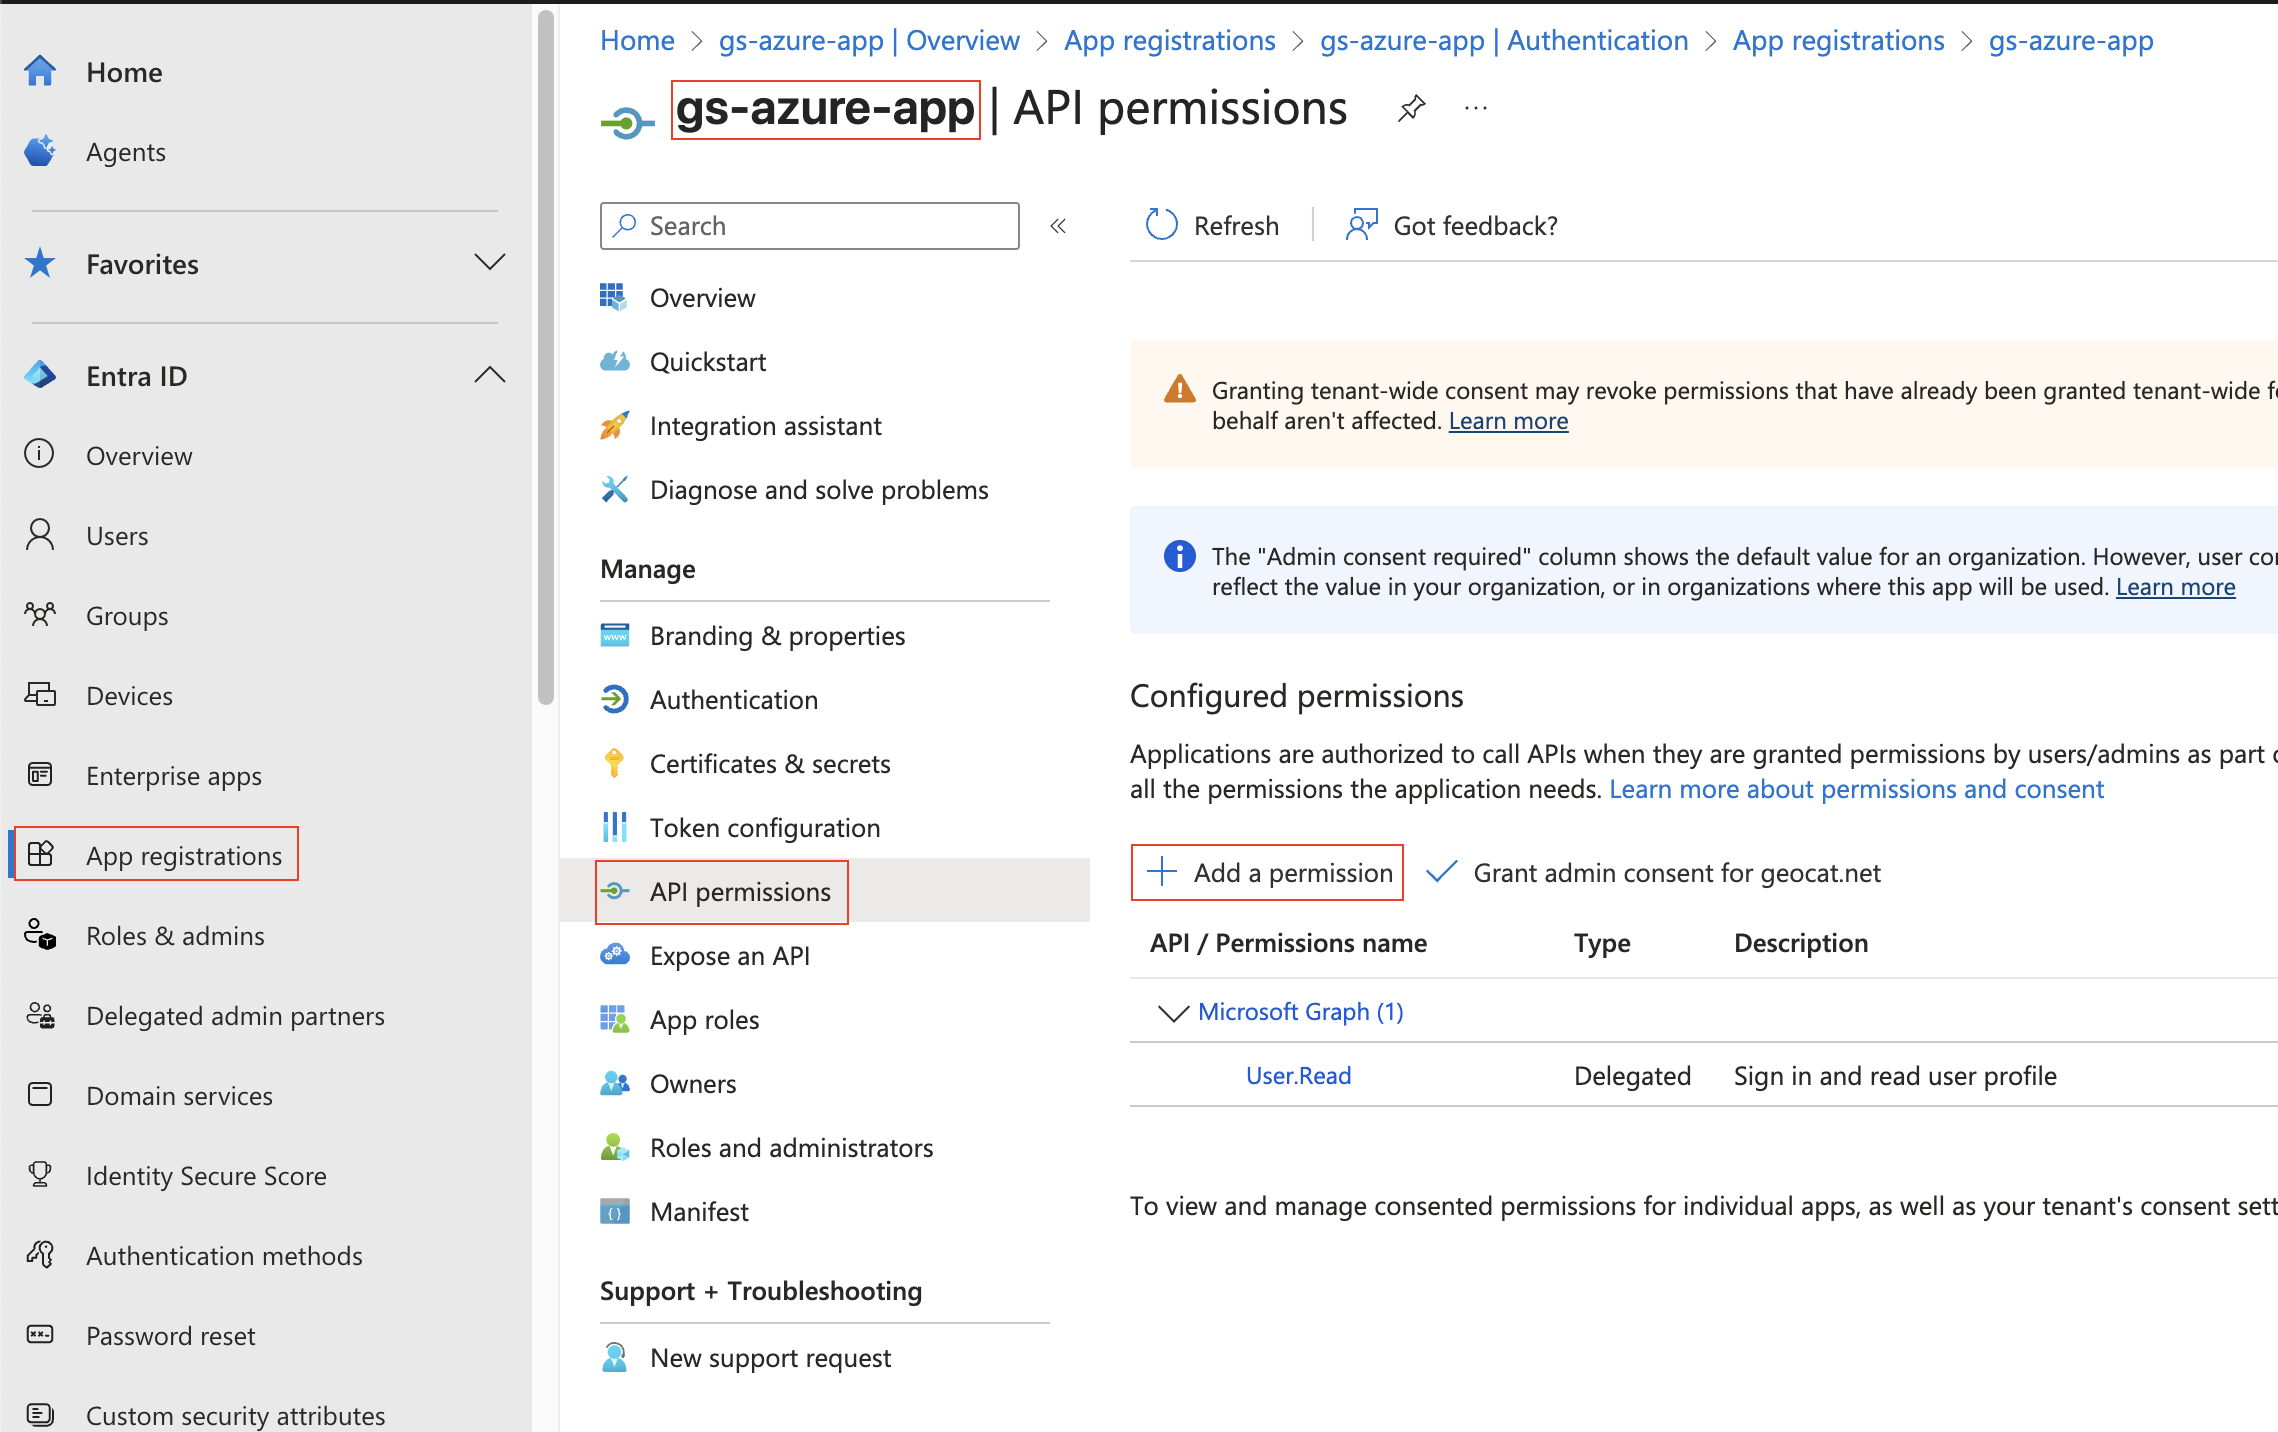
Choose “Microsoft Graph”
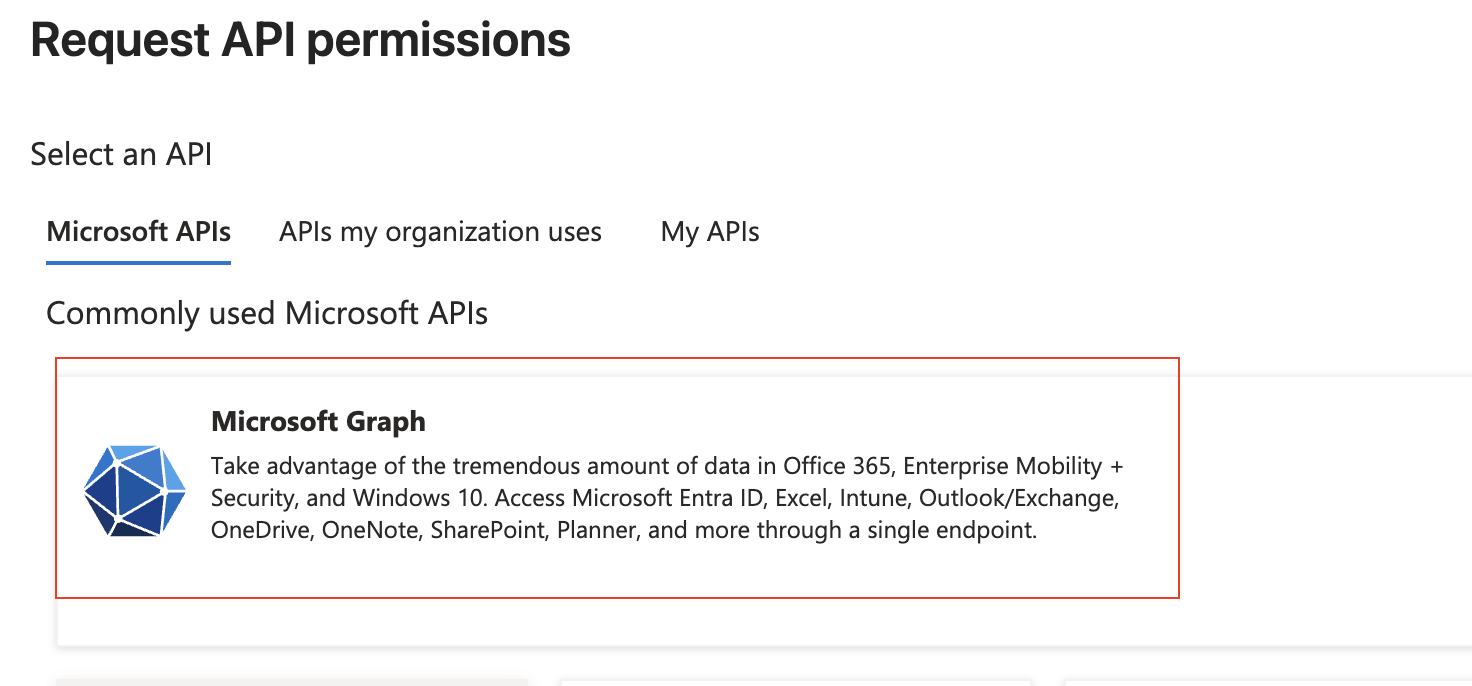
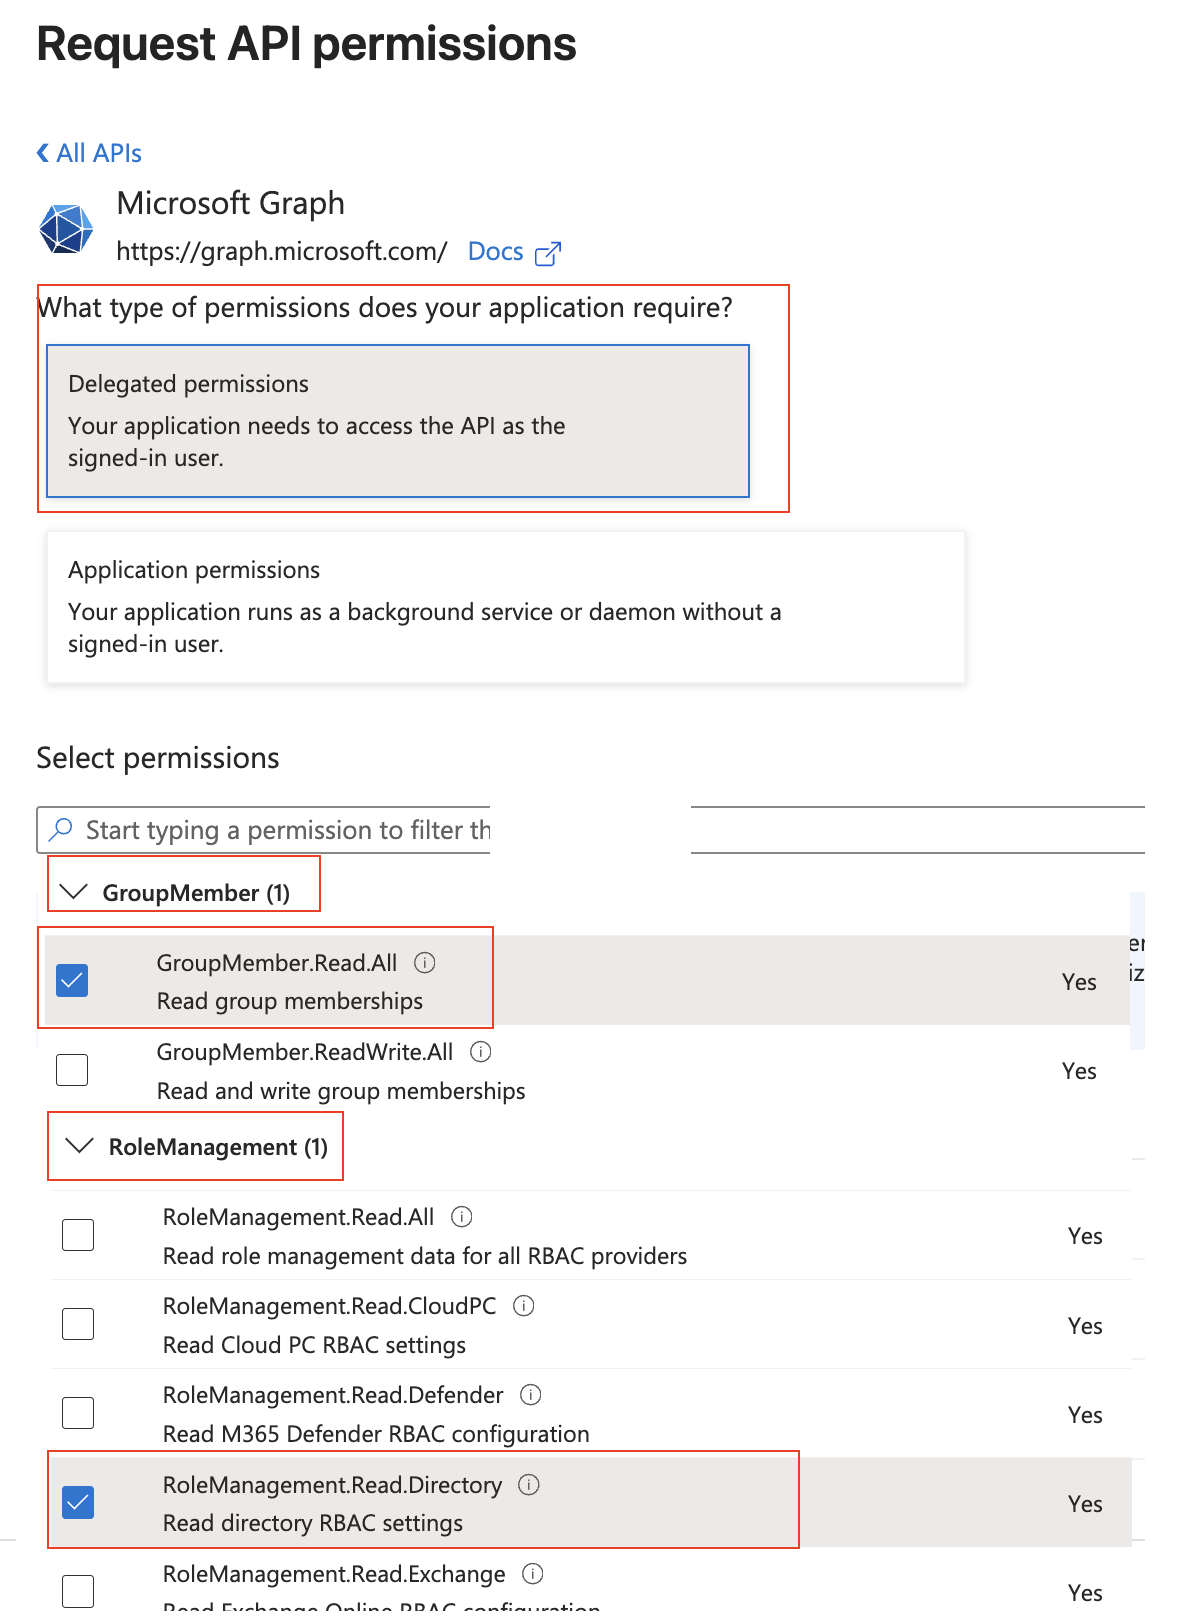
Then add the “GroupMember.Read.All” and “RoleManagement.Read.Directory” permissions and press “Add permissions”
At the top, select “Delegated permissions”
Scroll down to “GroupMember” and select “GroupMember.Read.All”
Scroll down to “RoleManagement” and select “RoleManagement.Read.Directory”
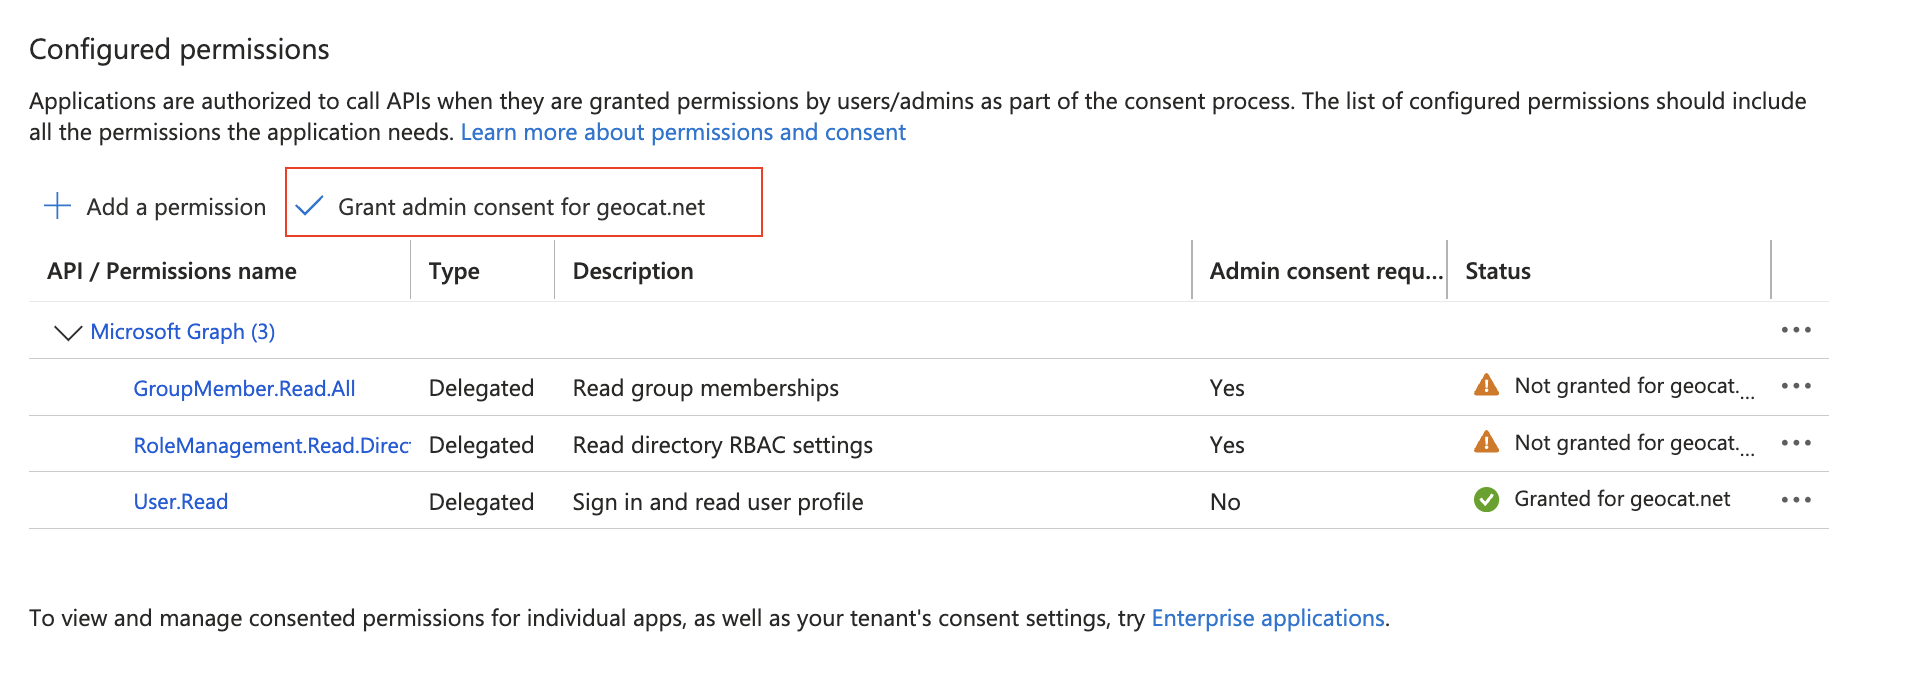
On the “Api permissions” screen, press “Grant admin consent for …”
This will pop-up a confirmation - press “Yes”
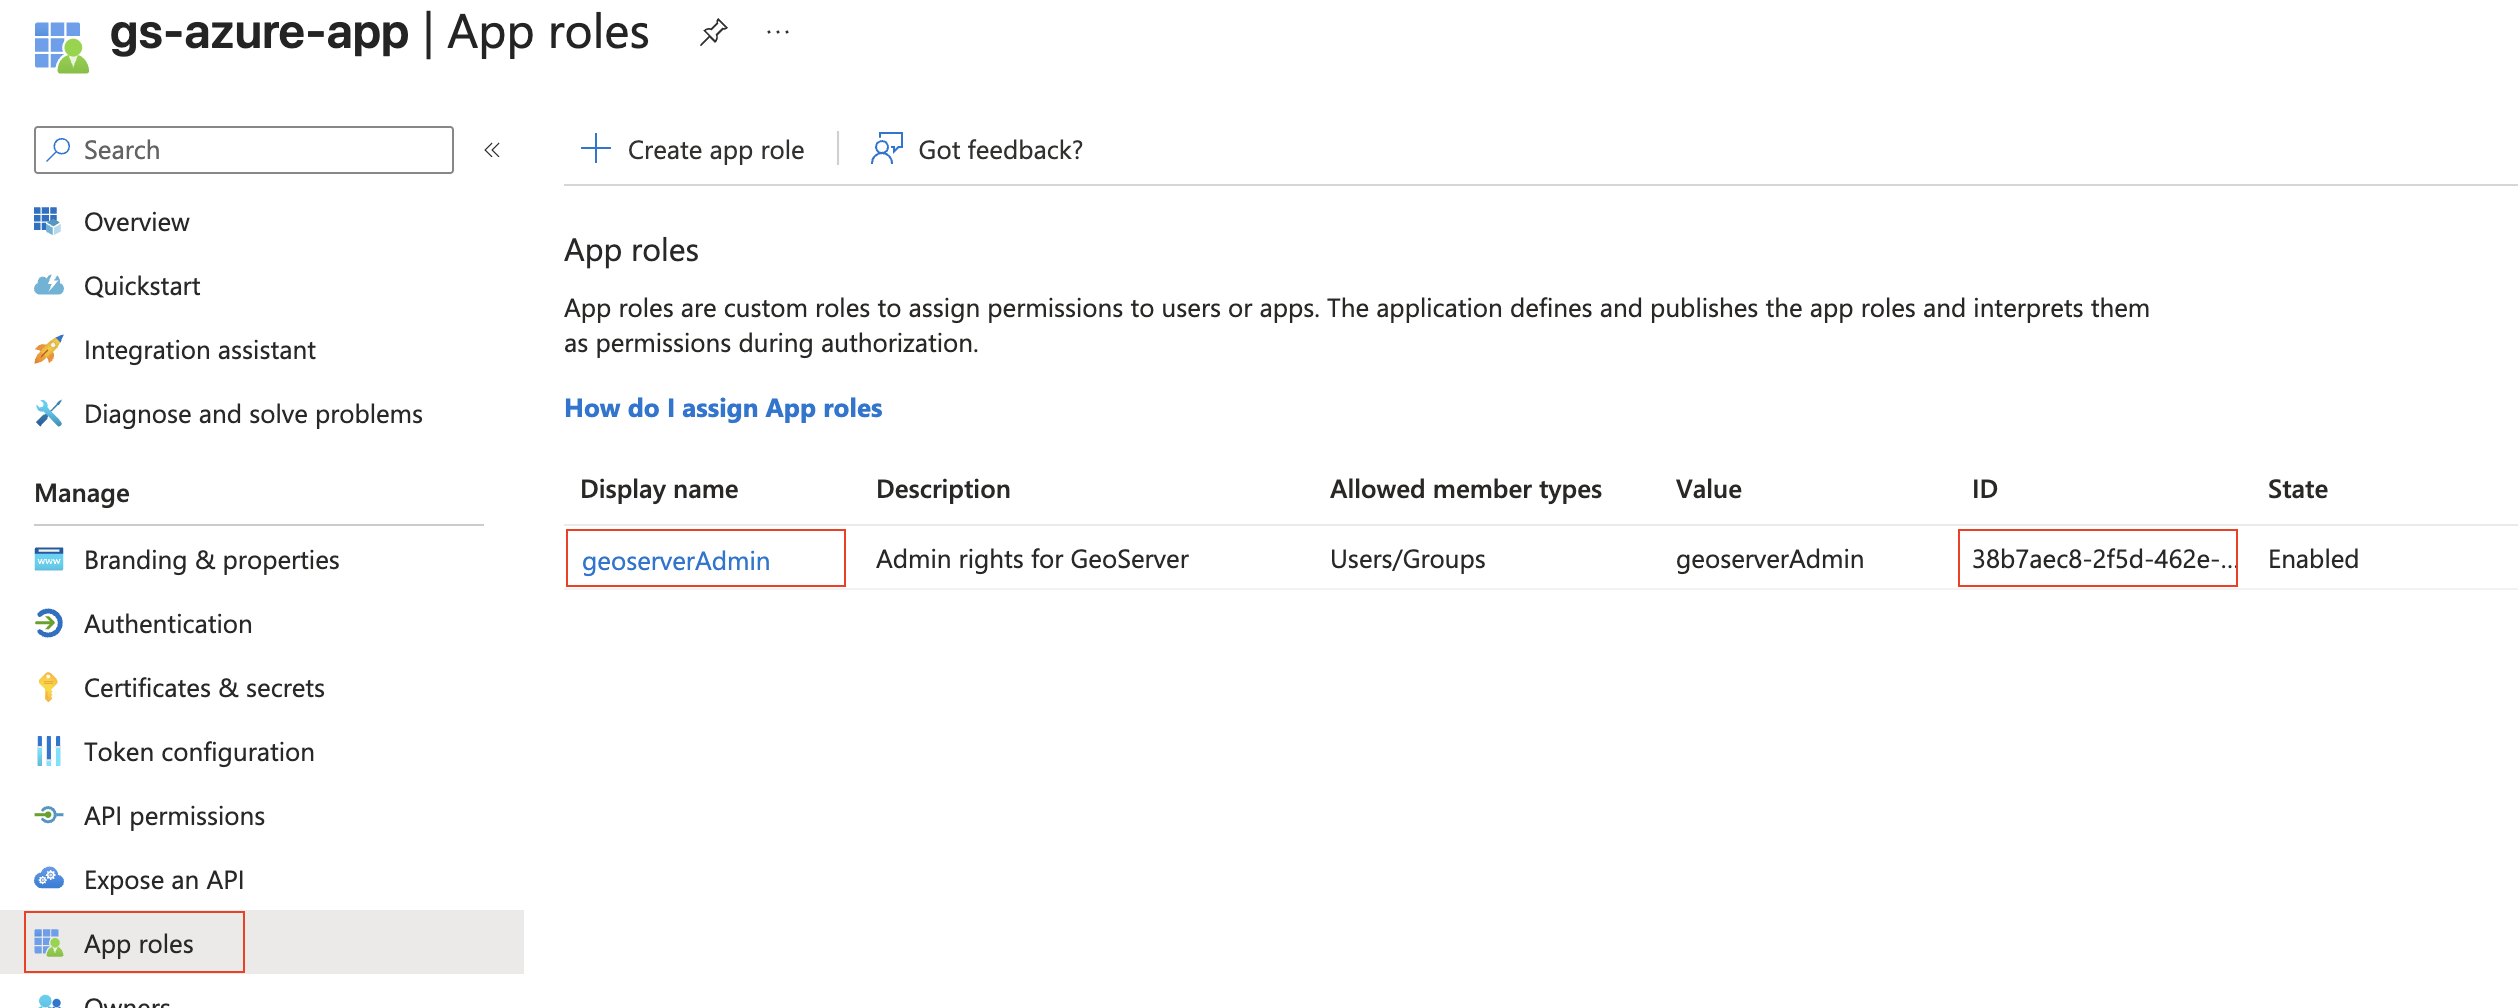
On the left column, press “App roles” and copy the ID for the “geoserverAdmin” role (its a guid). You will need this in the next step.
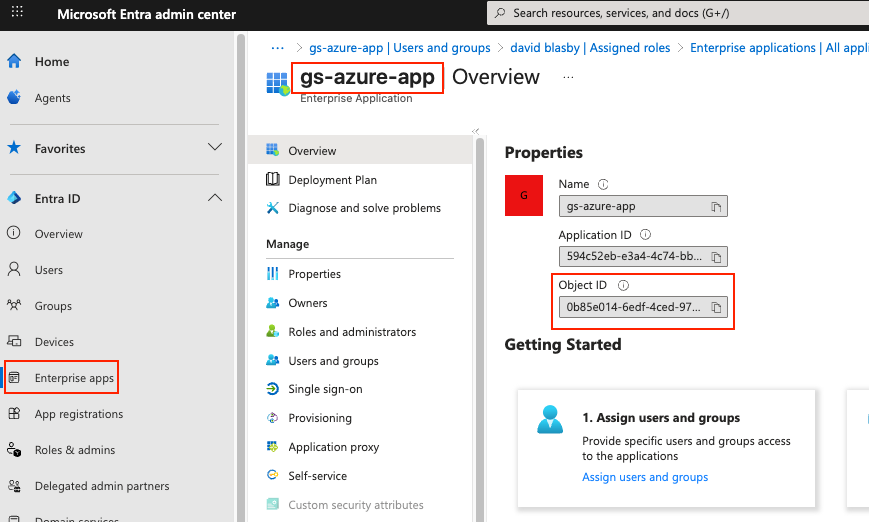
On the far left column, press “Enterprise Apps”, choose your application (“gs-azure-app”), and copy the “Object ID” (not the Application ID). You will need this in the next step.
Setting up GeoServer
You will need:
“geoserverAdmin” role id (GUID)
Your enterprise application’s Object ID (GUID). This is NOT the Client ID.
Login into GeoServer as the ROLE_ADMINISTRATOR
On the left, go to “Security”->”Authentication”, and click on your OIDC filter (“oidc-azure”)
Scroll down to the “Authorization” section
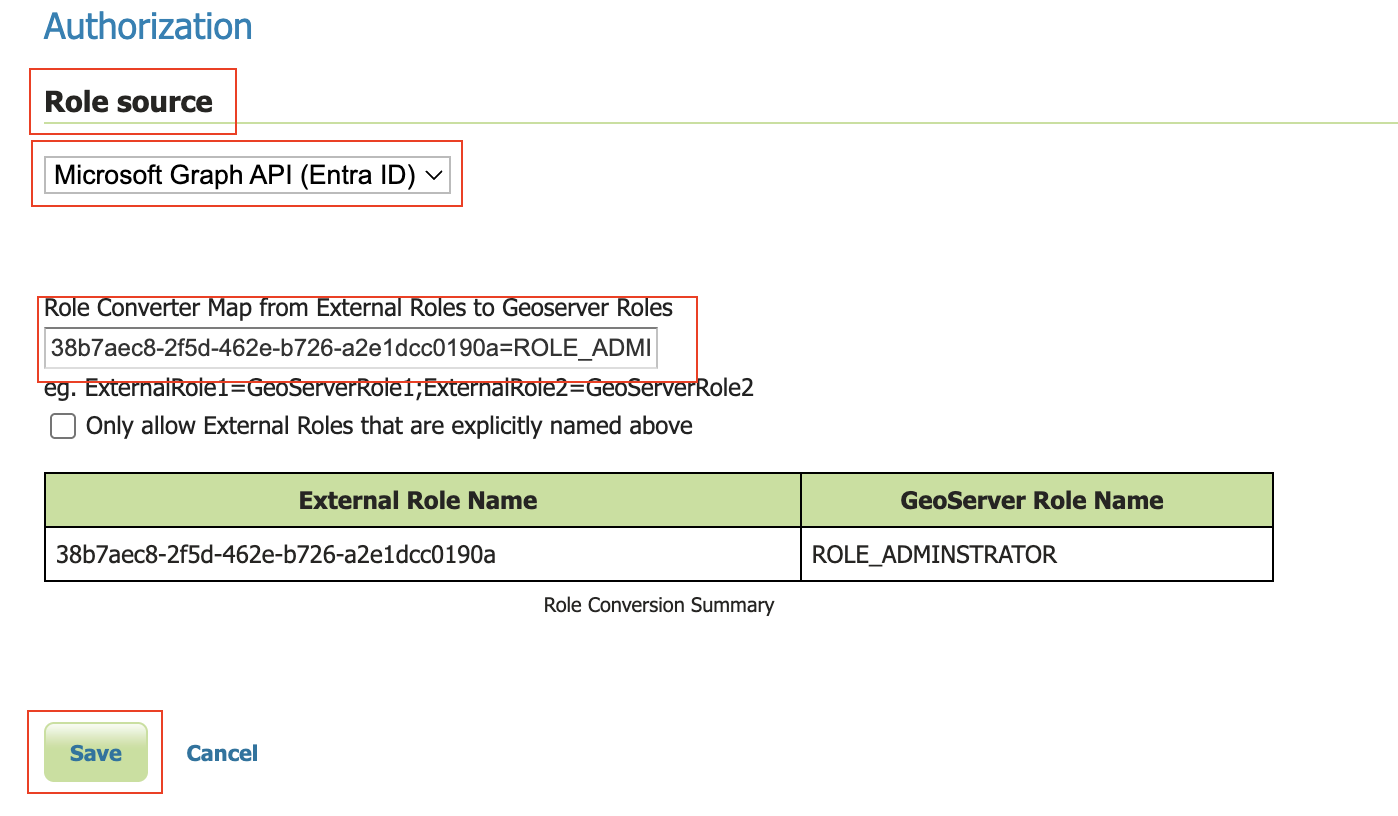
Choose “Microsoft Graph (Entra ID)”
Turn on “Get Roles from the User’s Application Roles (MSGraph appRoleAssignments endpoint)”. GeoServer will retrieve the user’s roles from the MSGraph’s “appRoleAssignments”. These roles are the Role ID (GUID) not the name of the role.
In the “Object Id for the Azure Enterprise Application (NOT the Client Id)” box, put in your enterprise application’s Object ID (GUID).
In the converter map, use the role id (guid) for “geoserverAdmin” (found above) and put in “<your geoserverAdmin GUID>=ROLE_ADMINISTRATOR”
Press Save
Notes
See troubleshooting.
Typical MS ID Token. Note that the roles have been put in the “roles” claim.
{
    "aud": "594c52eb-e3a4-4c74-bbdf-ccc803383c99",
    "iss": "https://login.microsoftonline.com/87f91494-c0dc-493e-83c3-9226c111850a/v2.0",
    "iat": 1759773505,
    "nbf": 1759773505,
    "exp": 1759777405,
    "email": "david.blasby@geocat.net",
    "name": "david blasby",
    "nonce": "m3HsvD9JqU4uWbP1oPzP3Wb-n5u-aXdJAd",
    "oid": "6ac682b6-6048-4eb6-b4ca-2538e33cc",
    "preferred_username": "david.blasby@geocat.net",
    "rh": "1.AV8AlBT5h9zAPkmDw5ImwRGFCutSTFmk43RMu9_PAXZfAA.",
    "roles": [
        "geoserverAdmin"
    ],
    "sid": "009988c9-ae02-a521-d4cc-9aaf1a722",
    "sub": "oV3o_mu_PccTipAPJSpLJxzdzV2LKZv8mDQauGnY",
    "tid": "87f91494-c0dc-493e-83c3-9226c10a",
    "uti": "DfmjGZesdUODrGNYAA",
    "ver": "2.0"
}